
This post is a bit more generic. Part of any sewing machine reconditioning involves the complete disassembly, cleaning, and reassembly of the upper tension mechanism. The problem I run across frequently is the improper assembly of the top tension mechanism. How does this happen? There is no way to know the complete history of a vintage sewing machine unless it has been in your family since it was new. There is no telling if the machine was “worked on” by someone with good intentions who took the assembly apart and didn’t put it back together correctly. The tension assembly is one of those parts that seems to be a target for the good intentioned… and often not properly reassembled.
The topic here is a Kenmore tension assembly, but the process can be generally applied to most any class 15 bobbin Japanese made machine. I have seen many tutorials on how to do this, but I have seen some that assemble it wrong. The assembly might work even if assembled incorrectly before the beehive spring and tension discs come into play, but it won’t be as smooth as it should be, or correctly calibrated the tension with the dial.
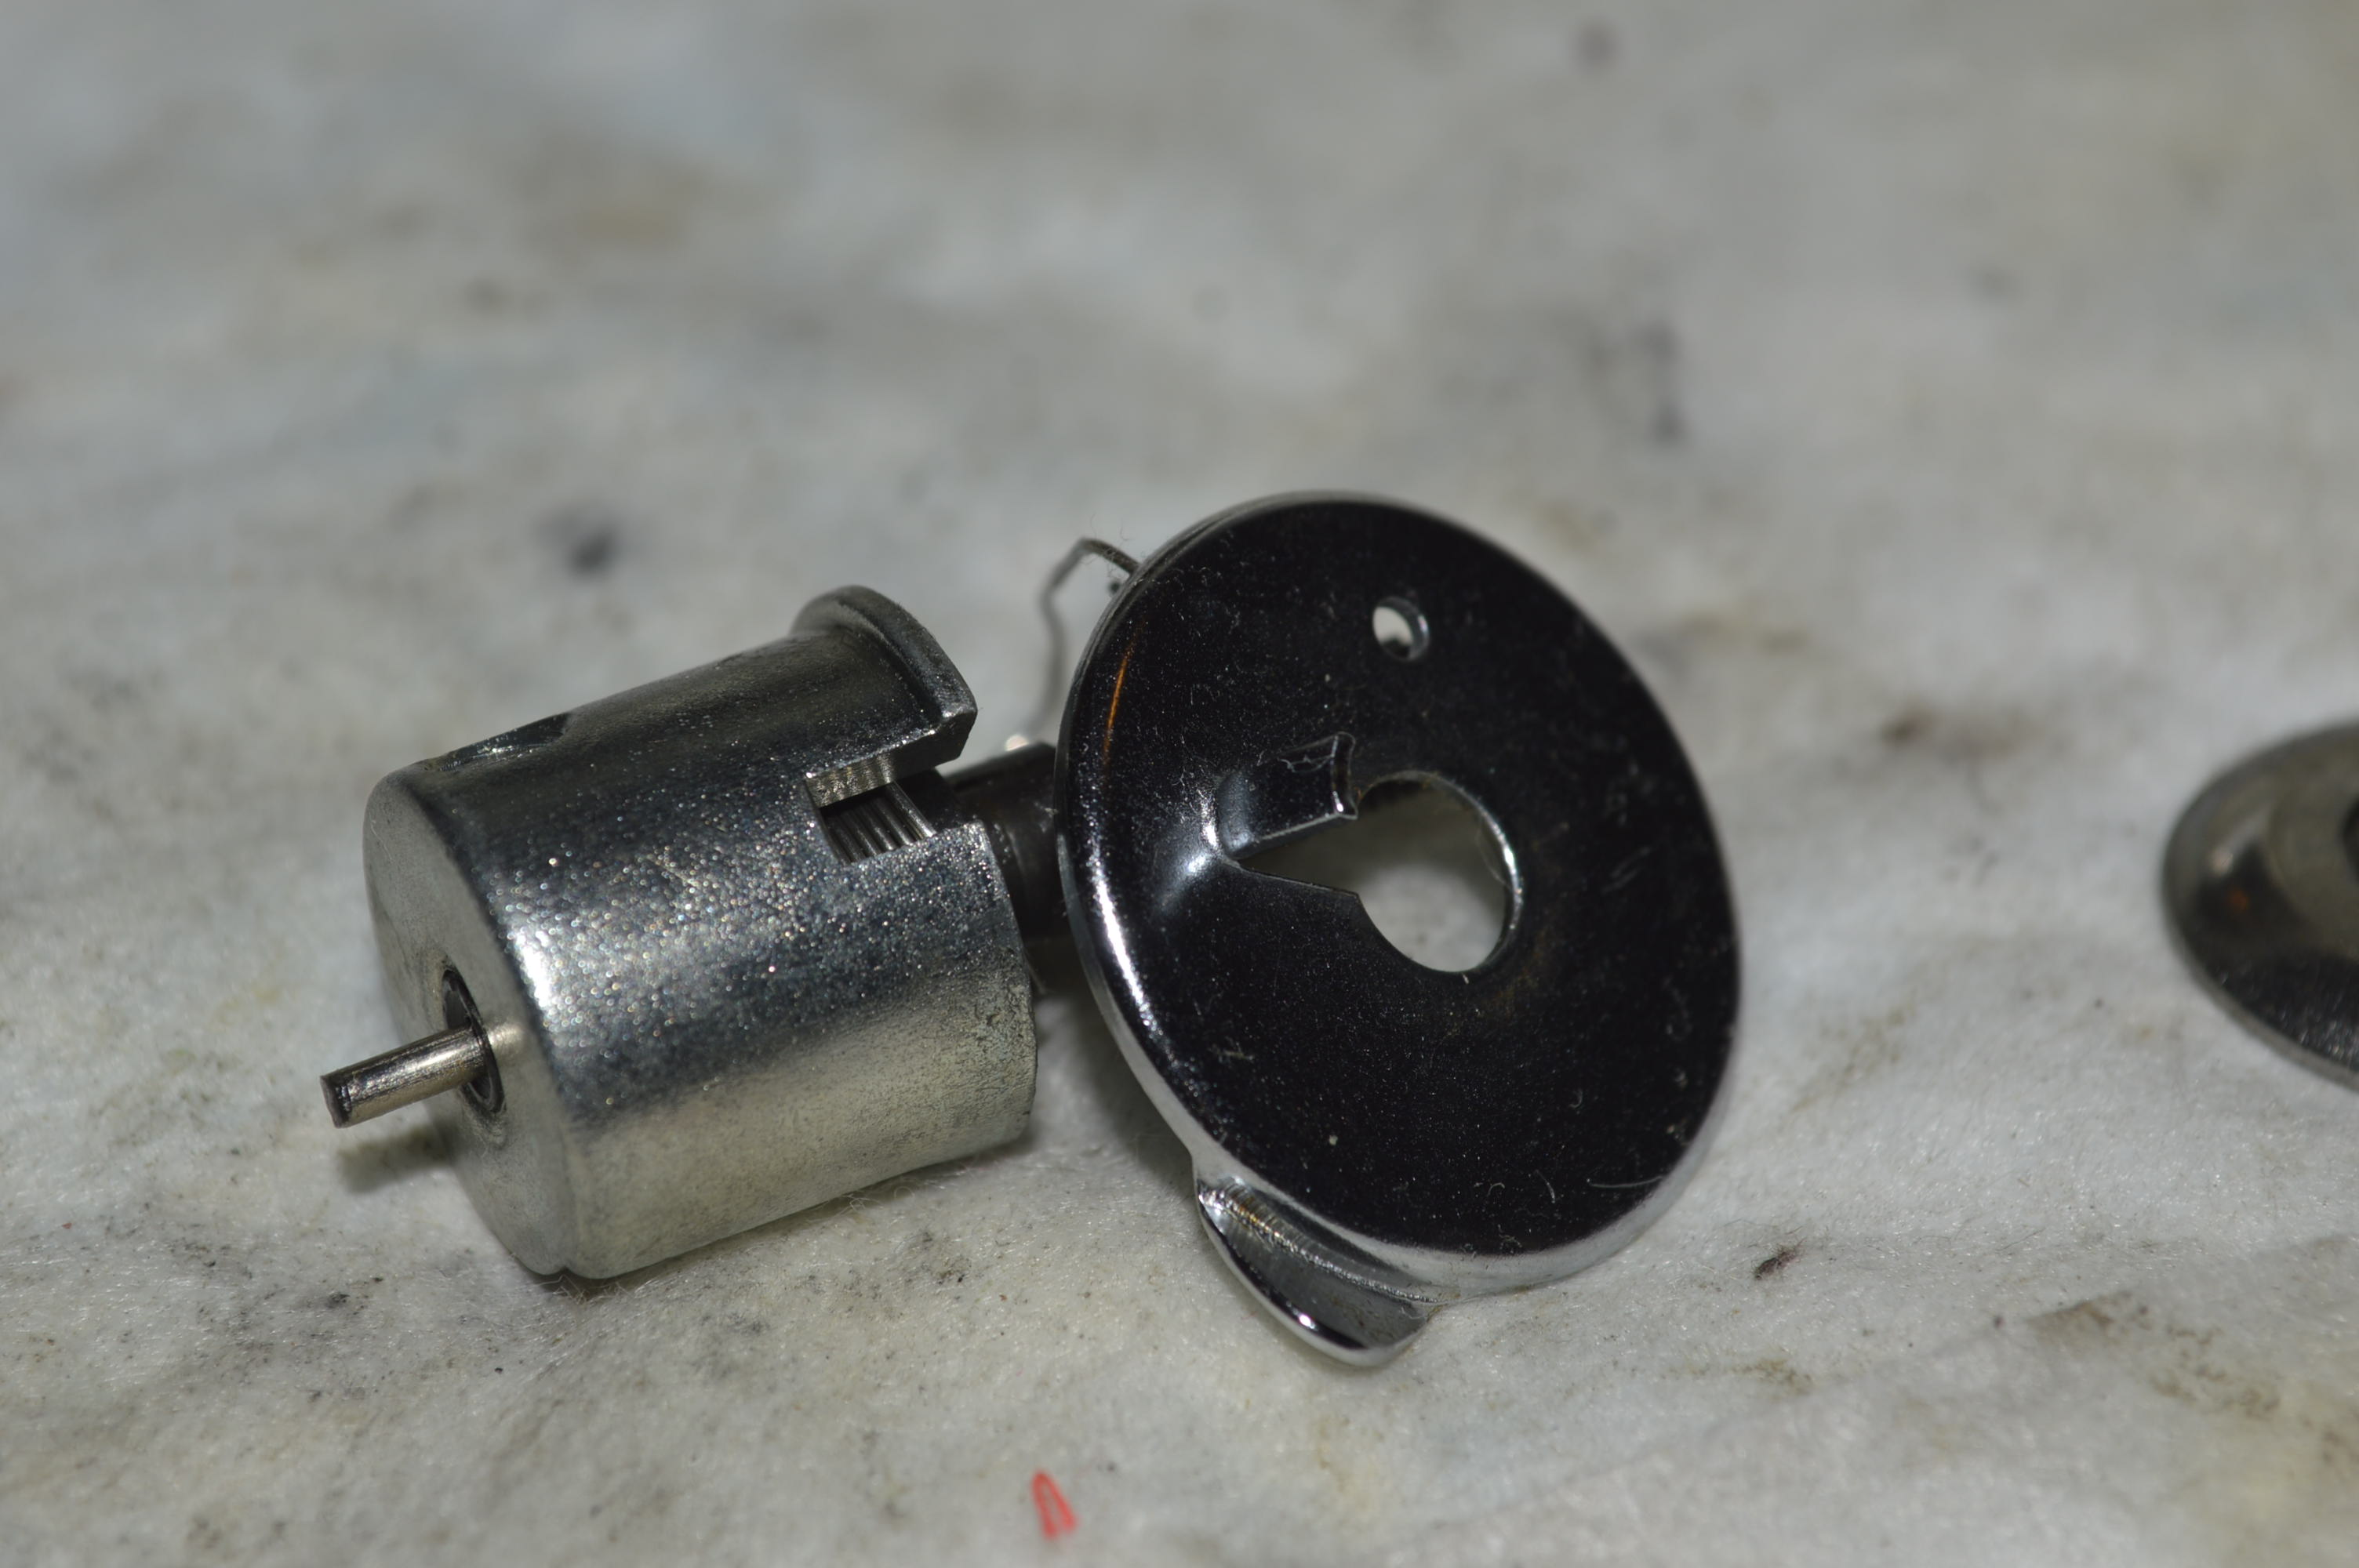
This is the right way to assemble this mechanism, and I will go into some detail… hopefully to the point where I’m not beating a dead horse. Here is the tension mechanism we are working on. It is from a Kenmore model 158.19412 and it is common to many Kenmores.
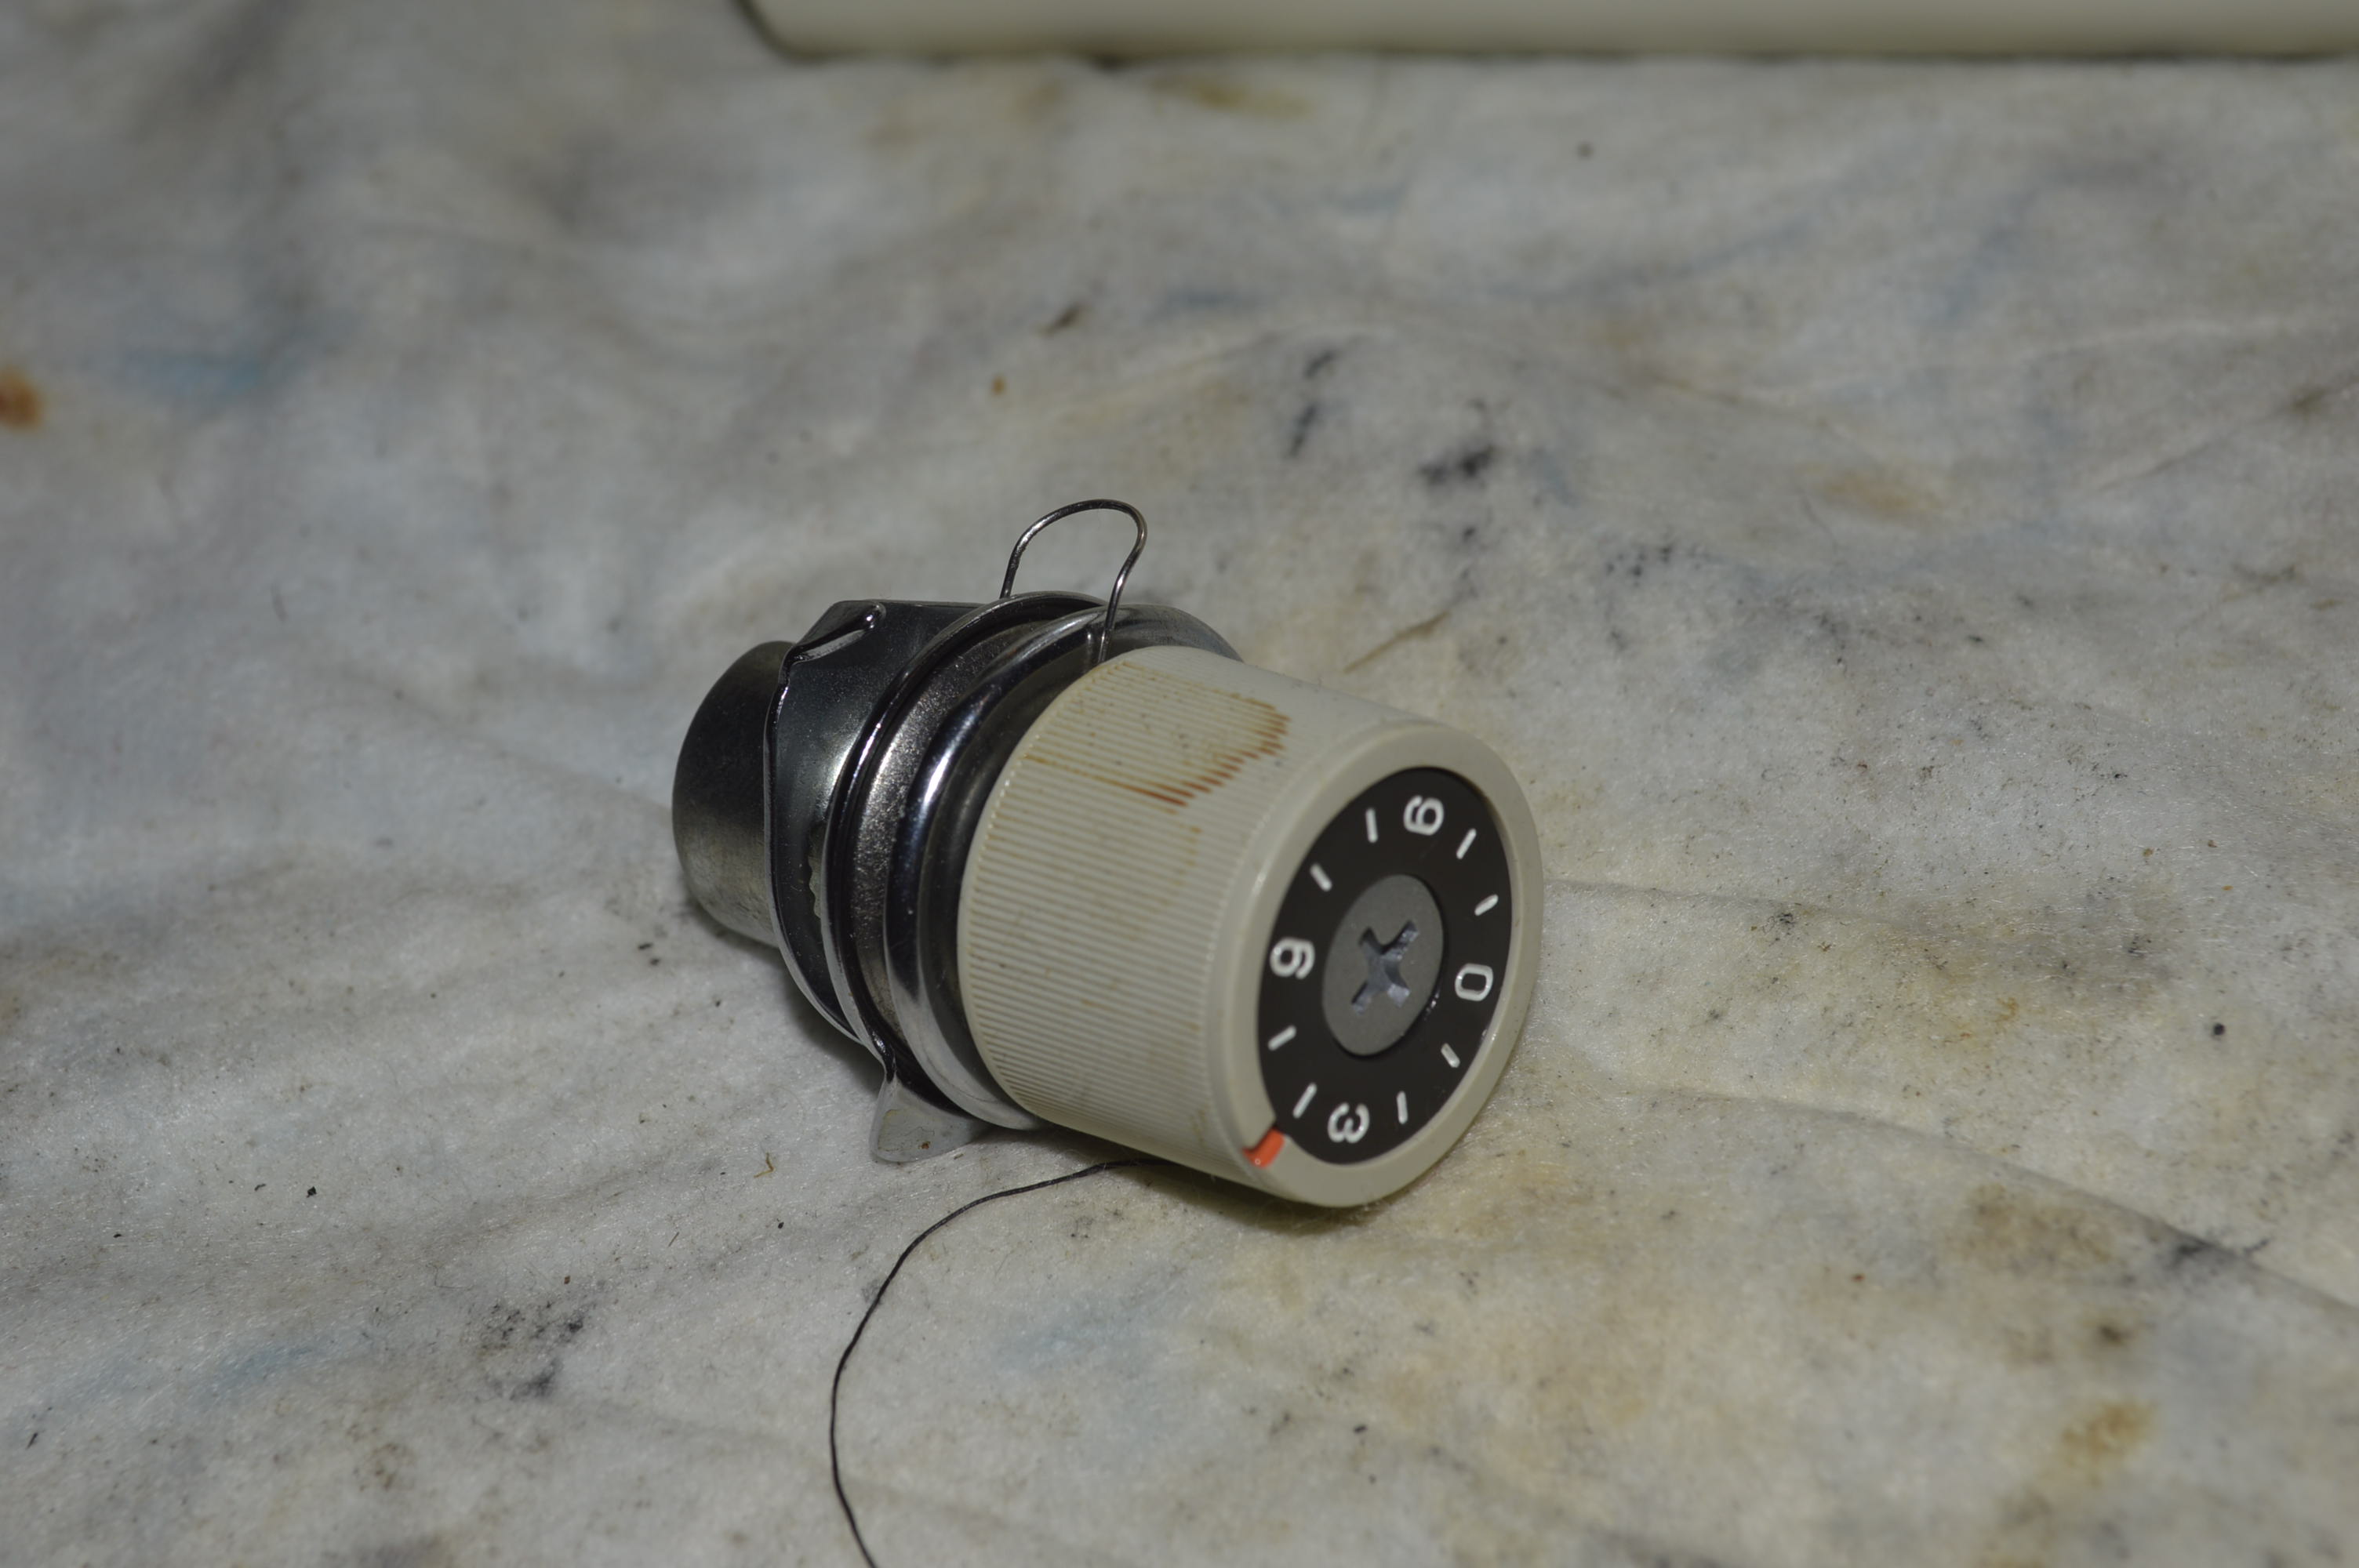
To remove the assembly, you need to open the front cover on the sewing machine’s nose…

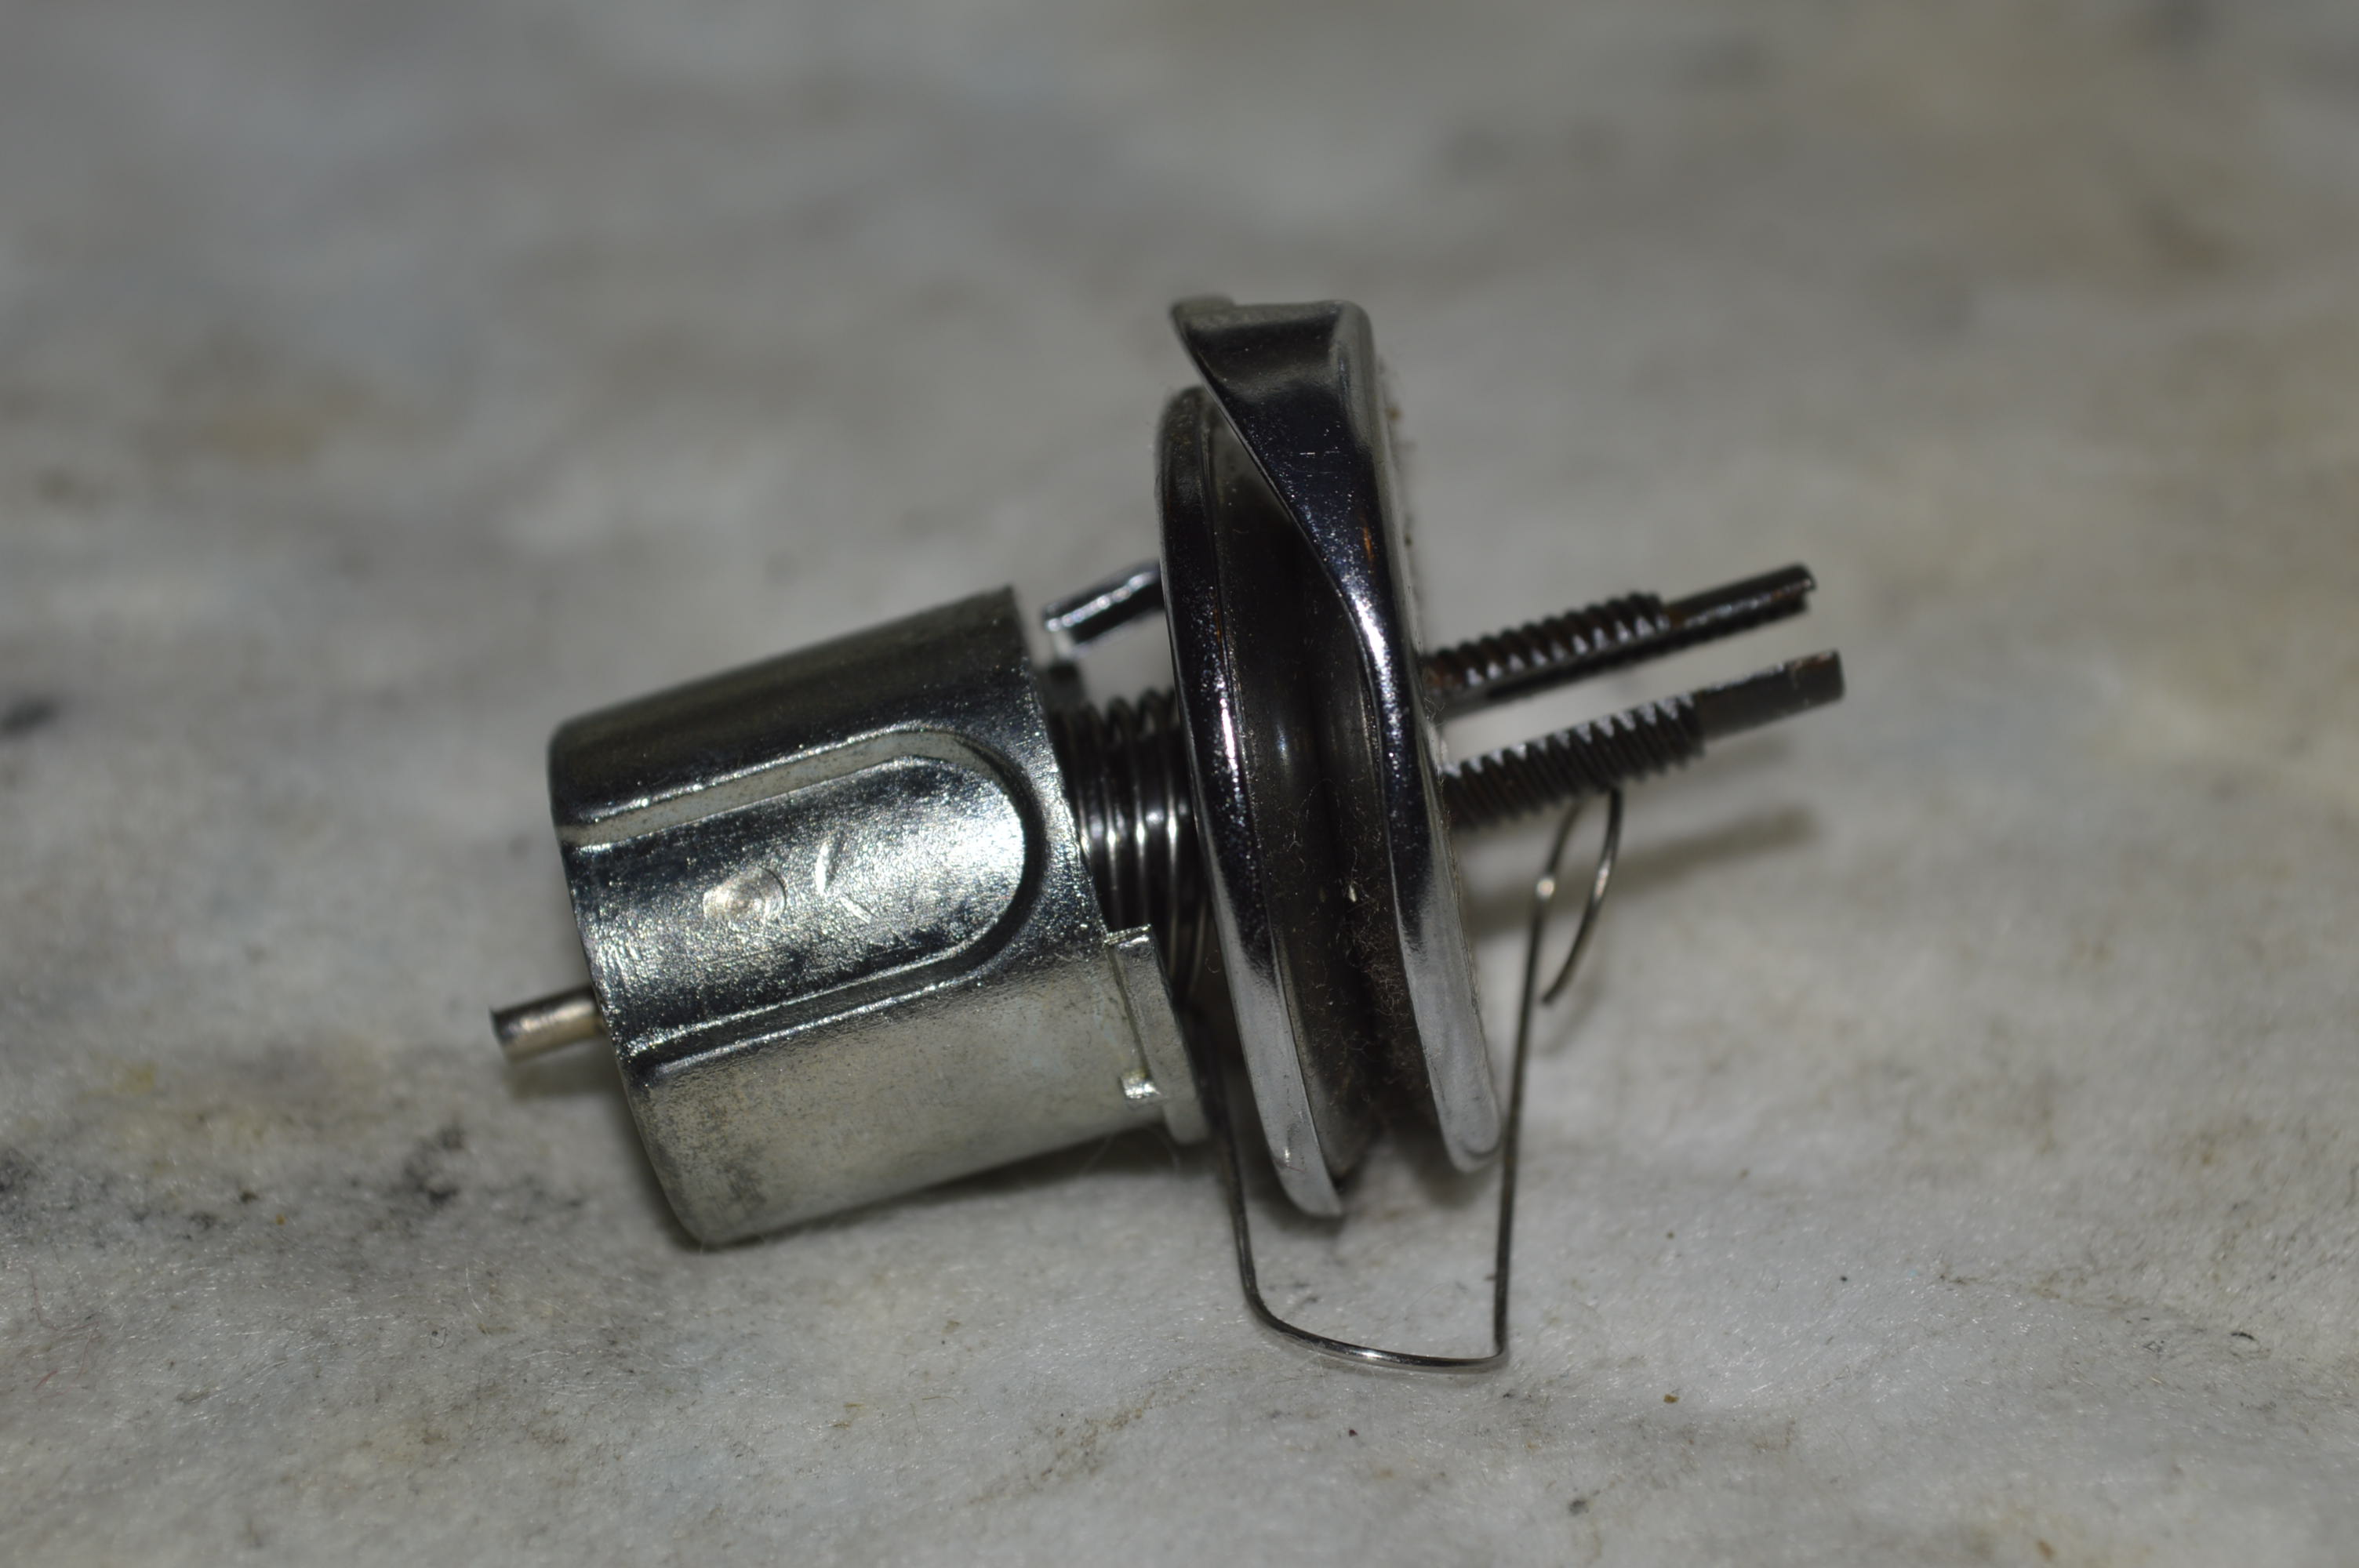
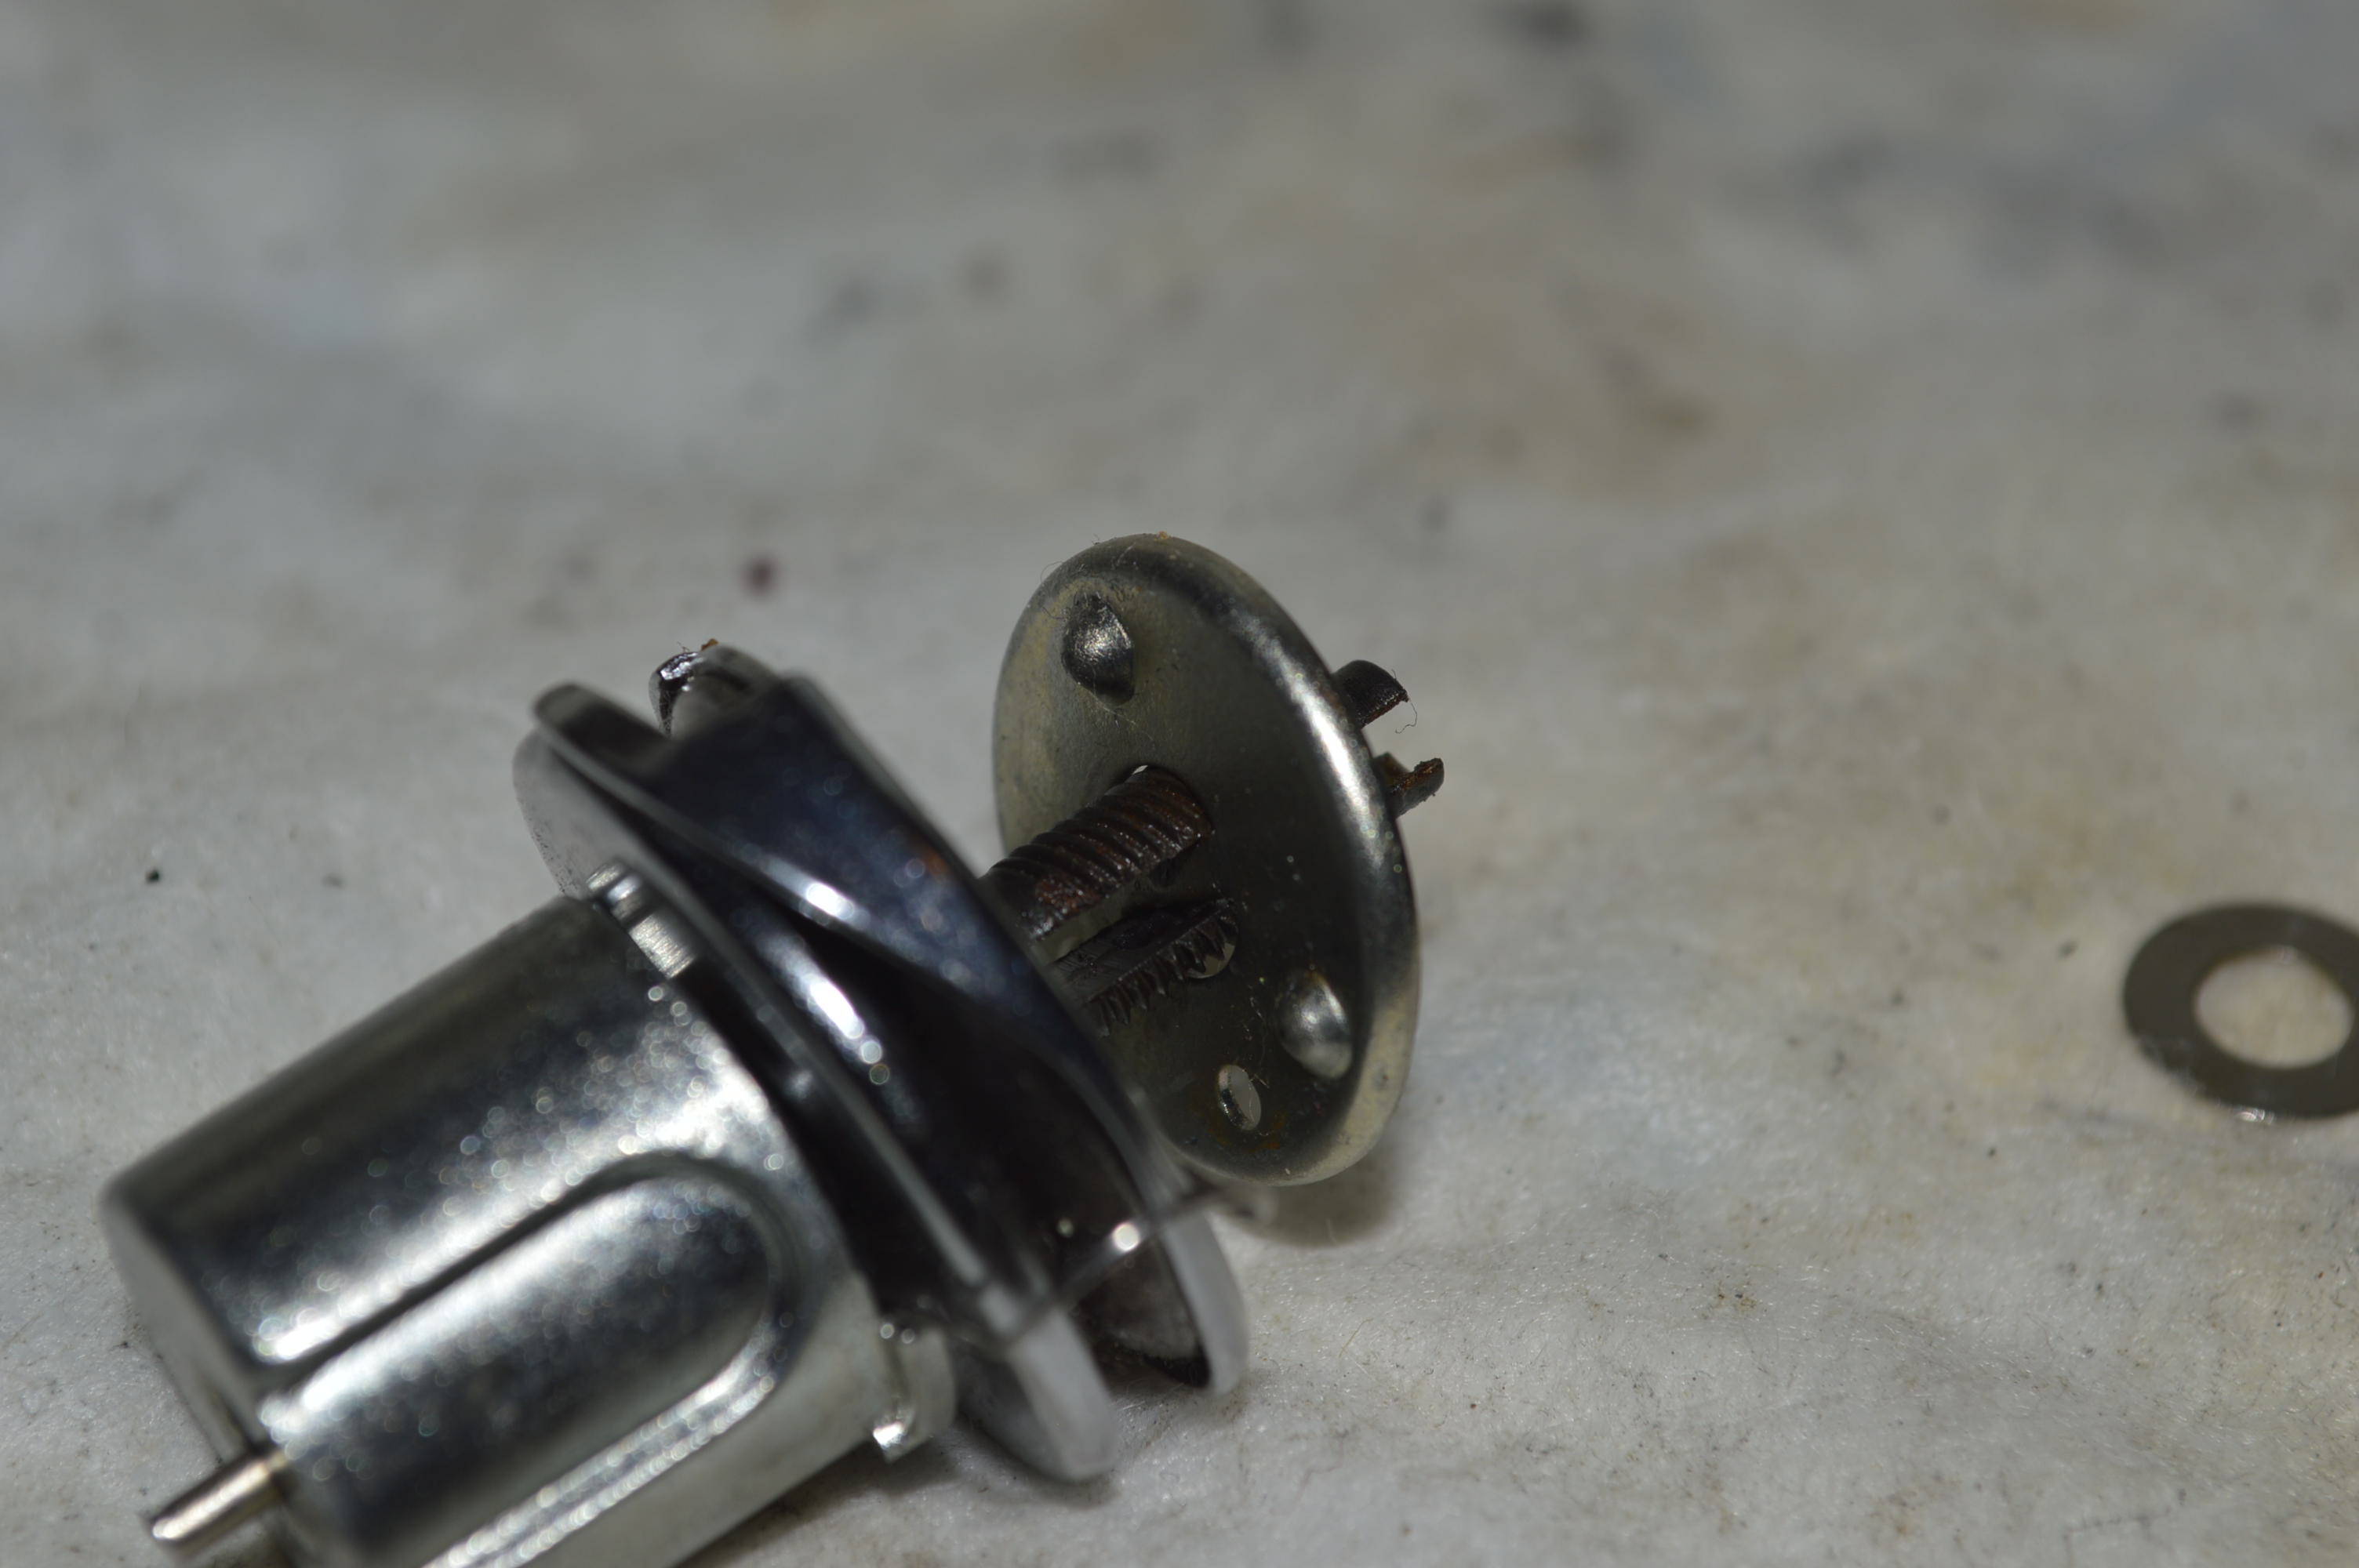
Loosening the small set screw shown behind the cover will allow the assembly to be removed from the machine. Note that the tension assembly has a backing plate that serves as a travel adjustment for the thread take up spring. This will separate from the assembly and will need to be reinstalled in essentially the same position. In proper adjustment, the spring will rest with no tension at the point the sewing needle just touches the fabric under the foot. Remove the tension assembly…

DISSASEMBLY
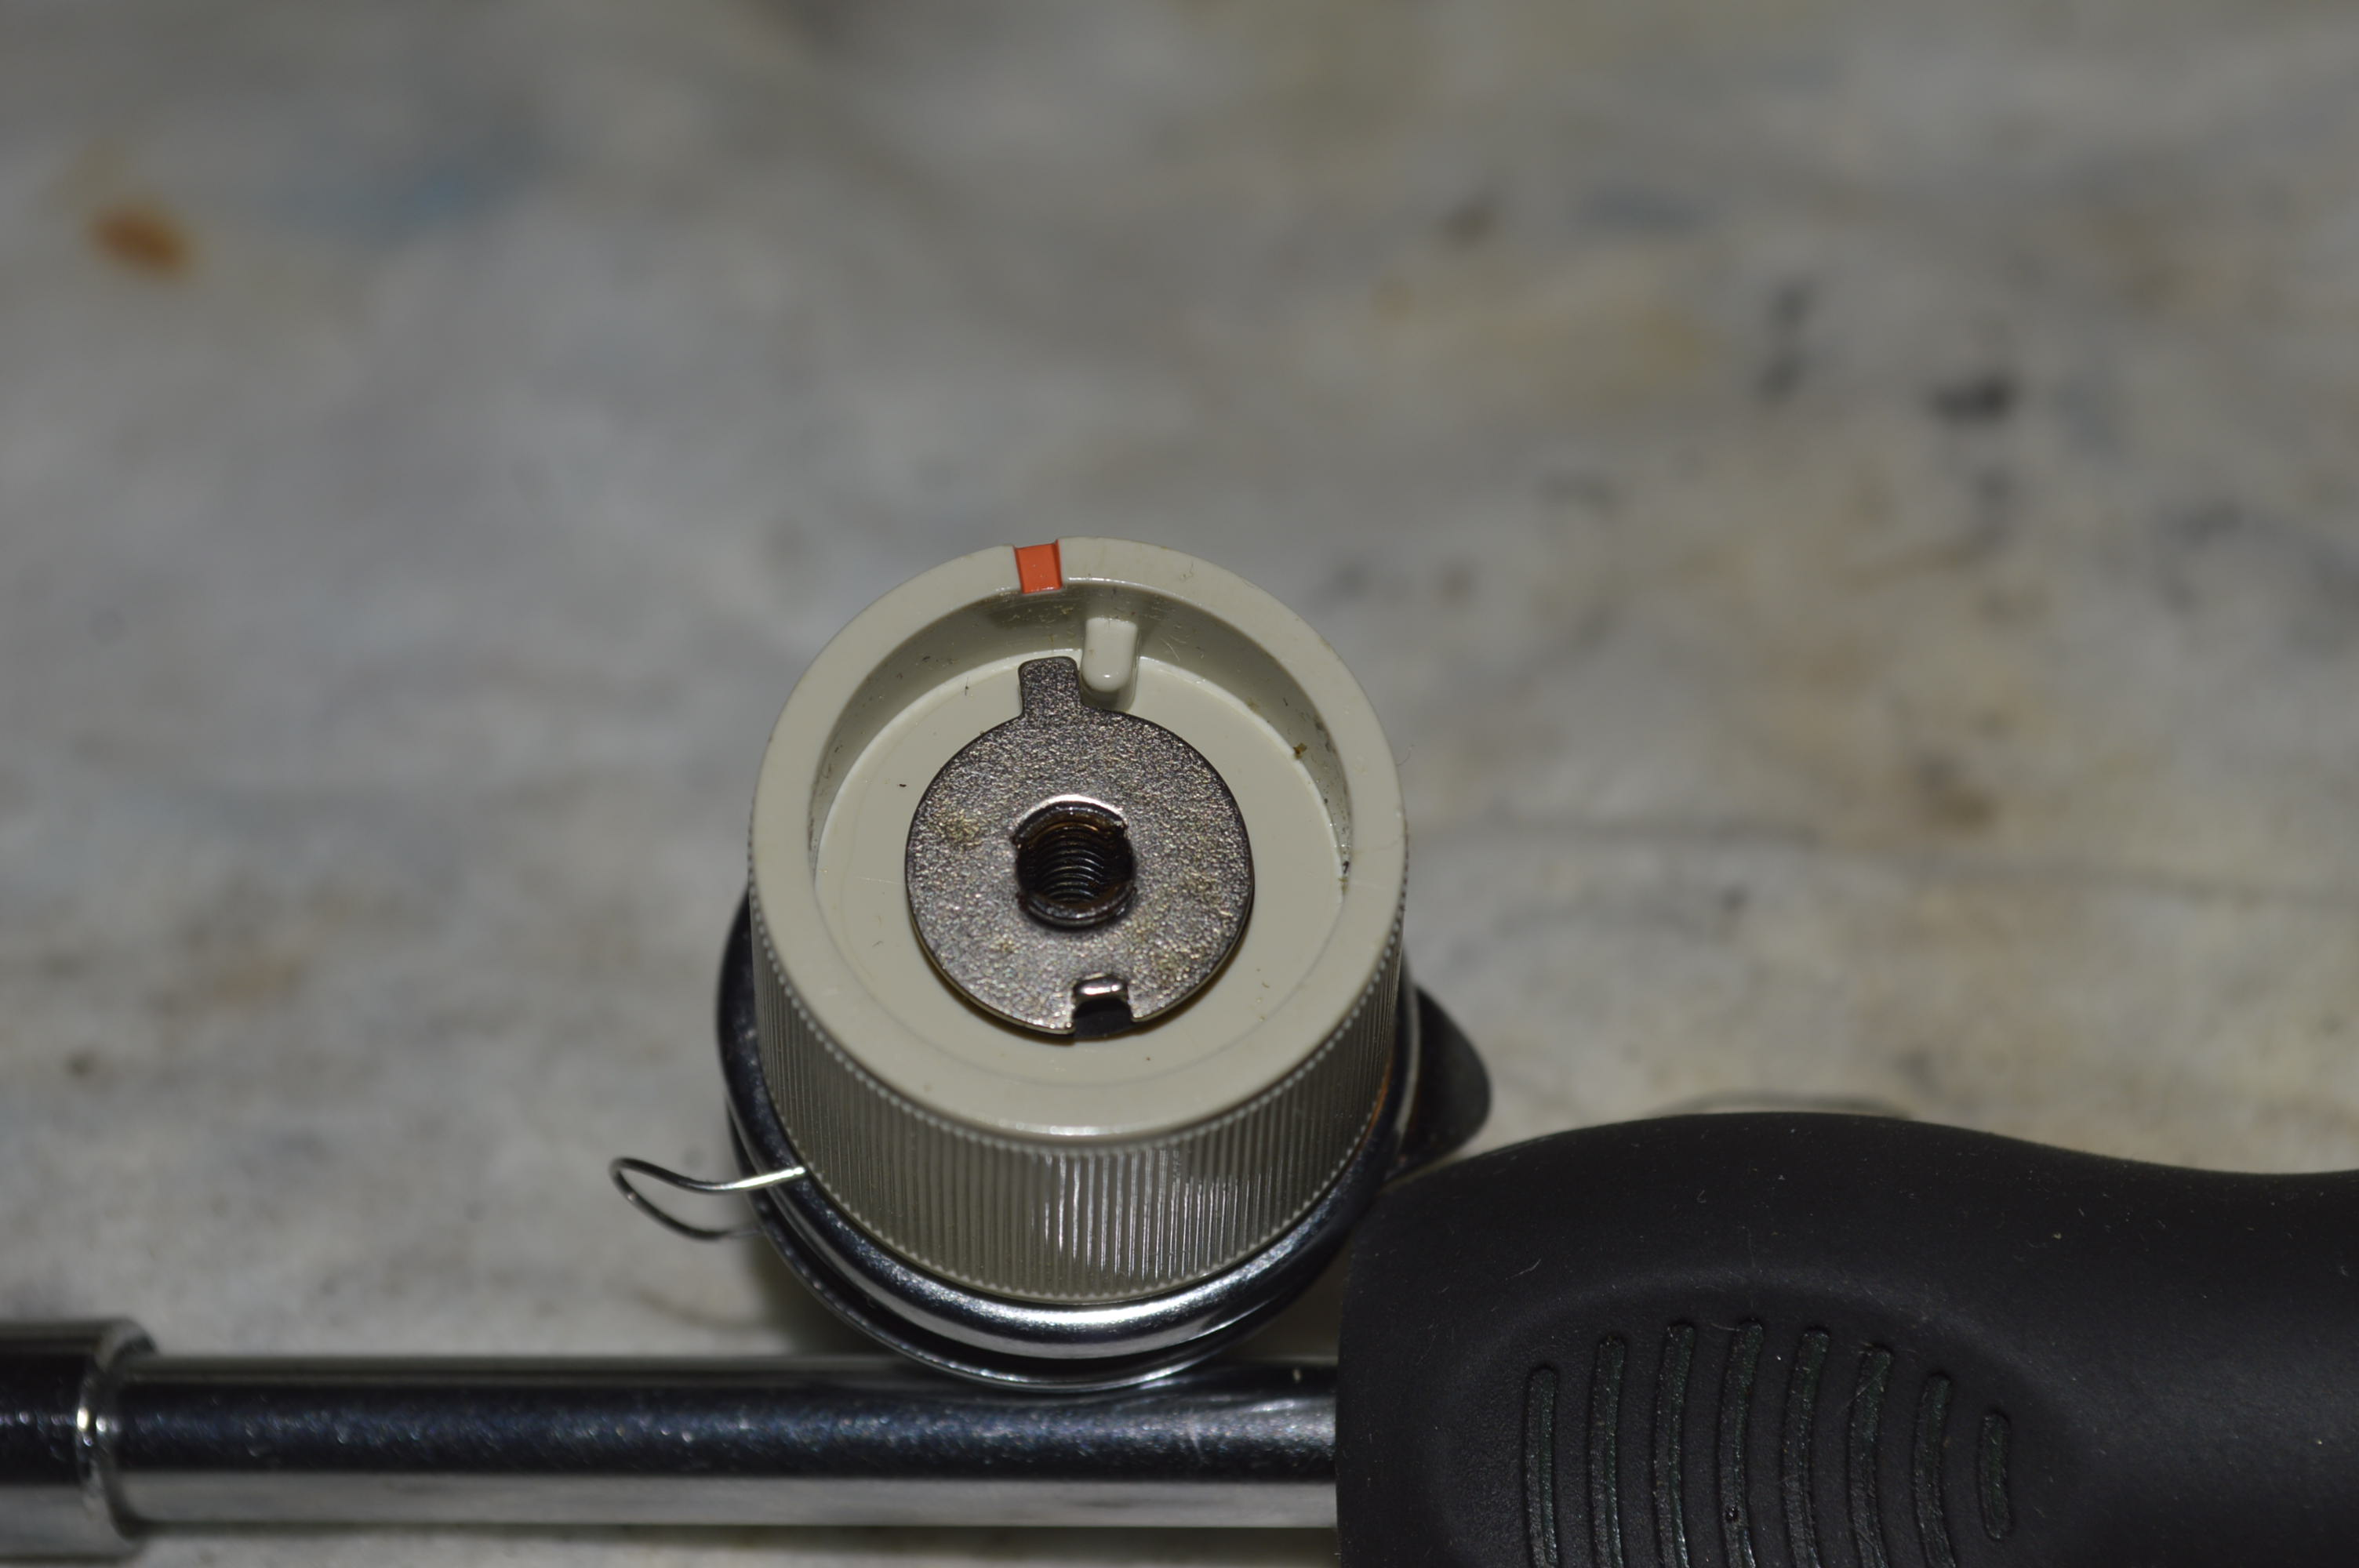
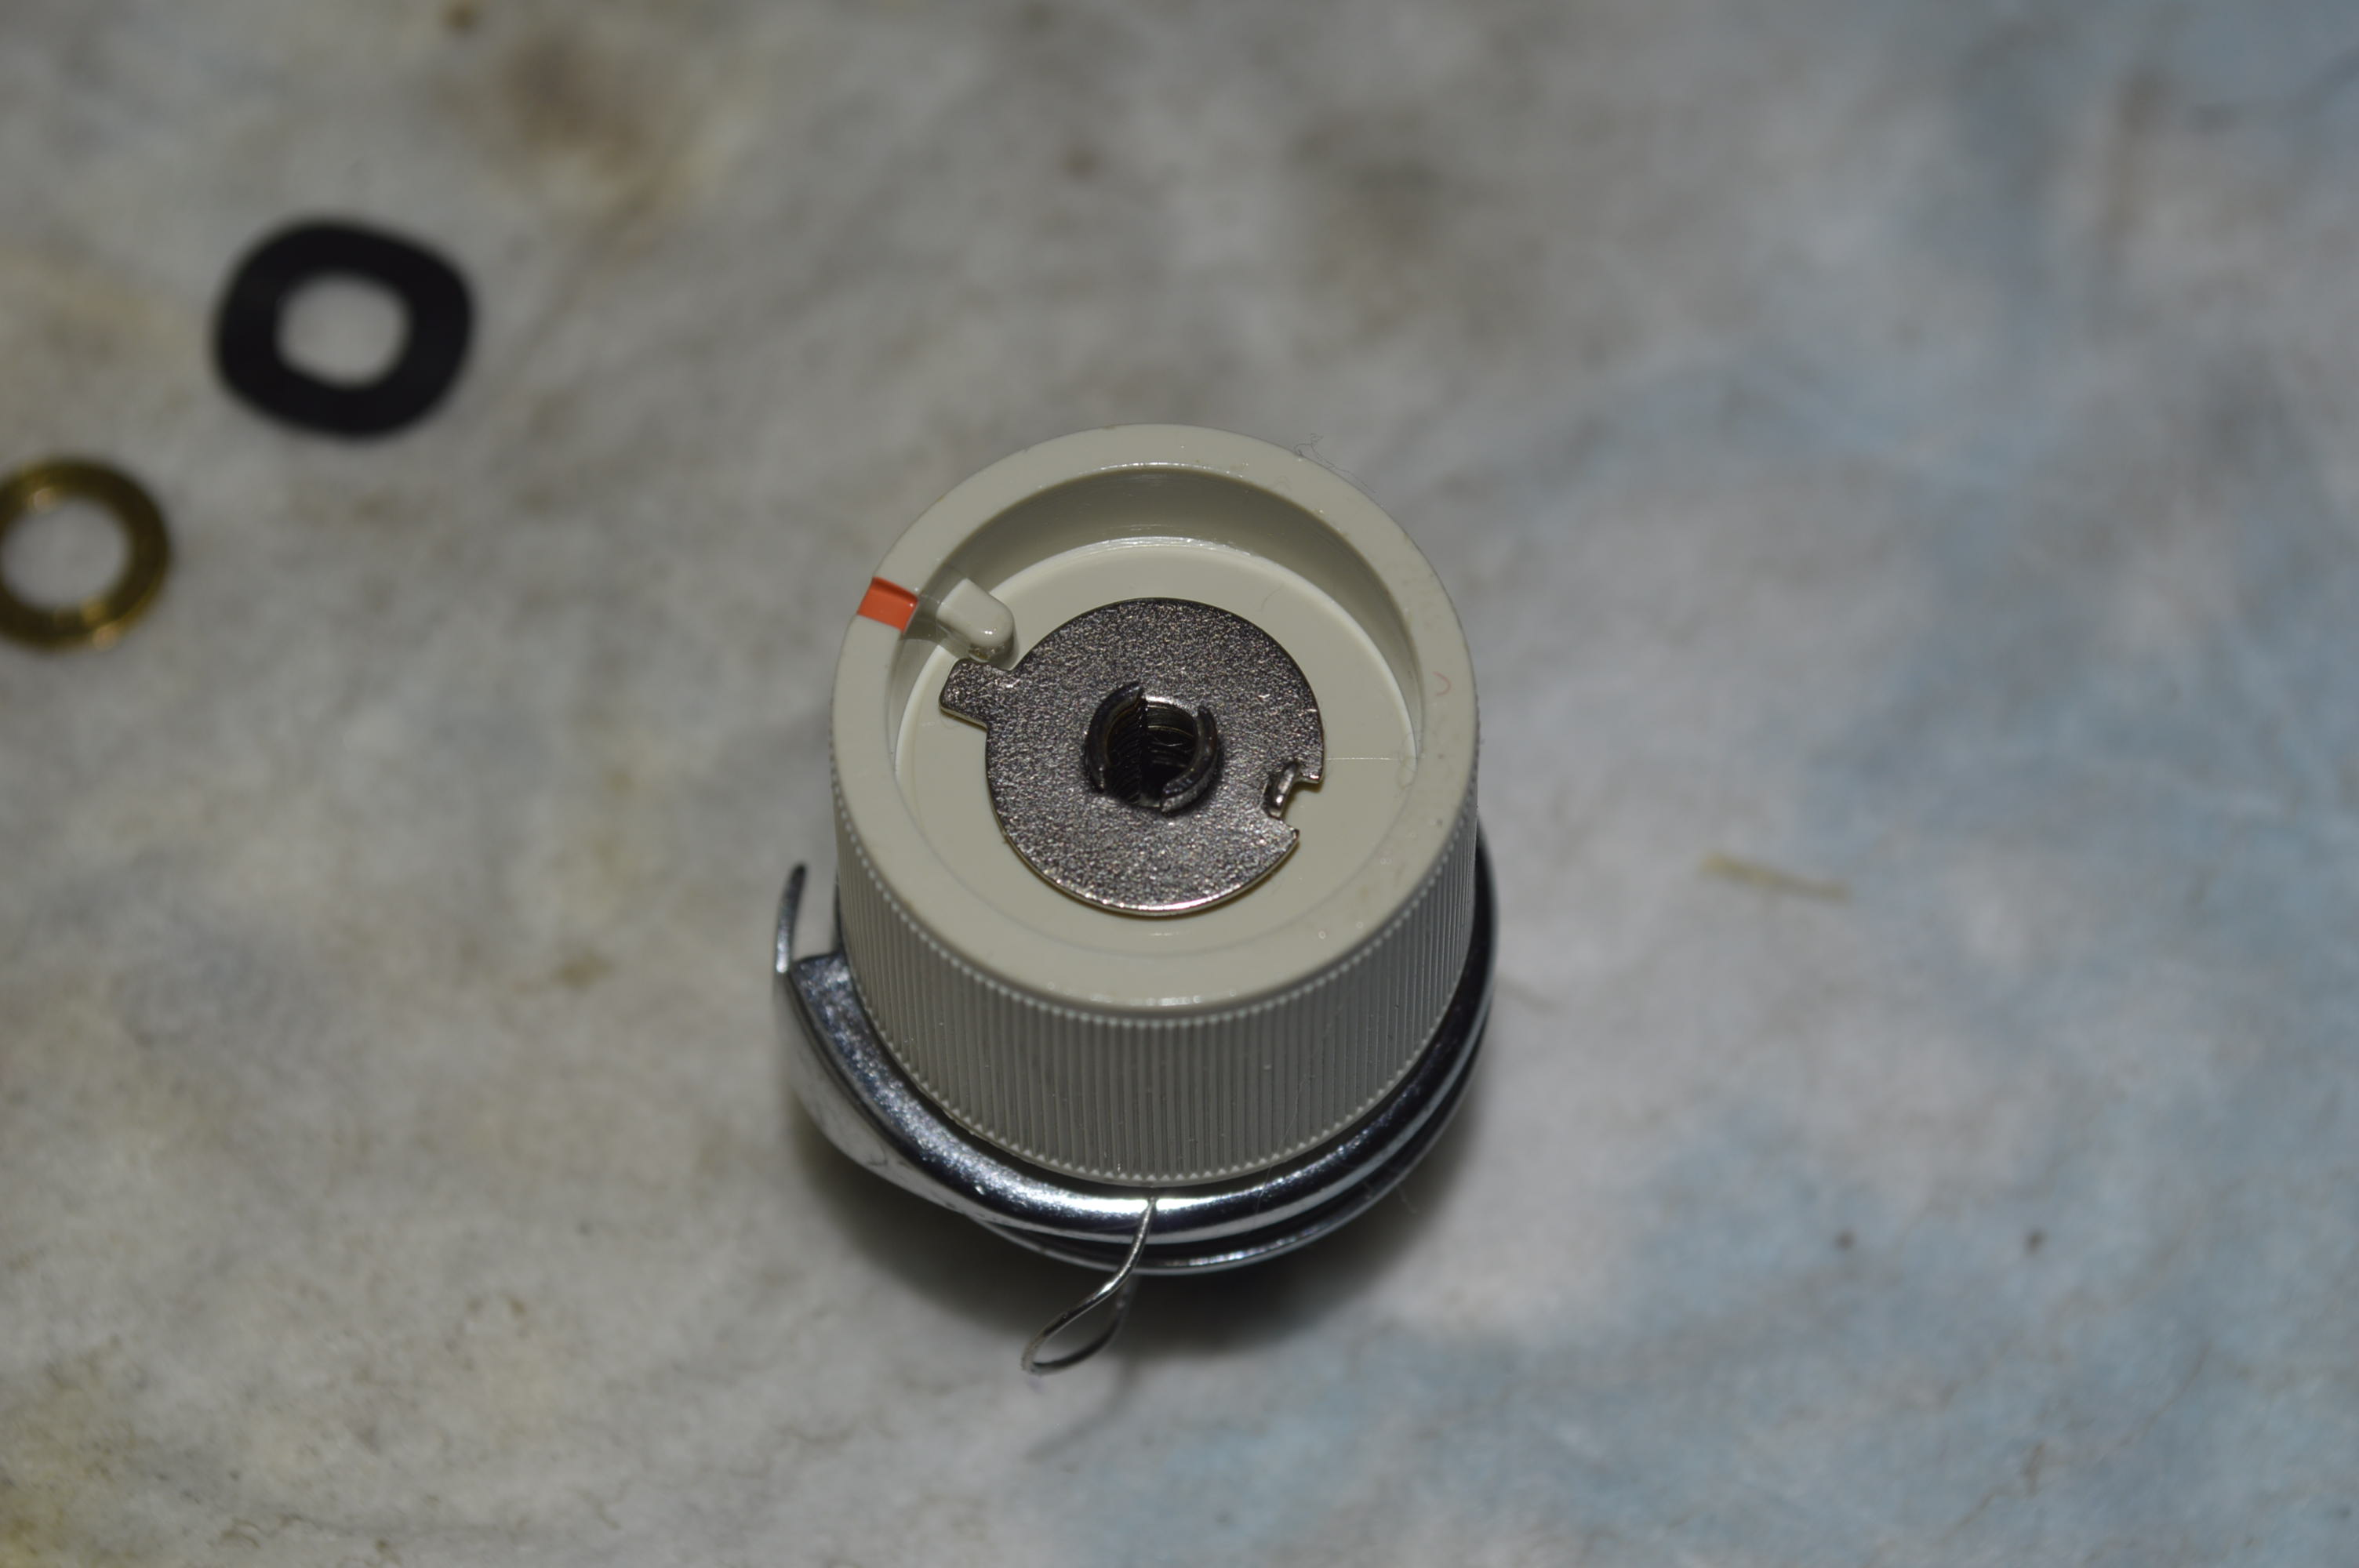
Remove the screw in the center of the tension dial. Be prepared for things to start falling out, The tension knob and parts controlling the dial stops are held in place by the screw. Remove the plastic numbered insert and this is what you should see…
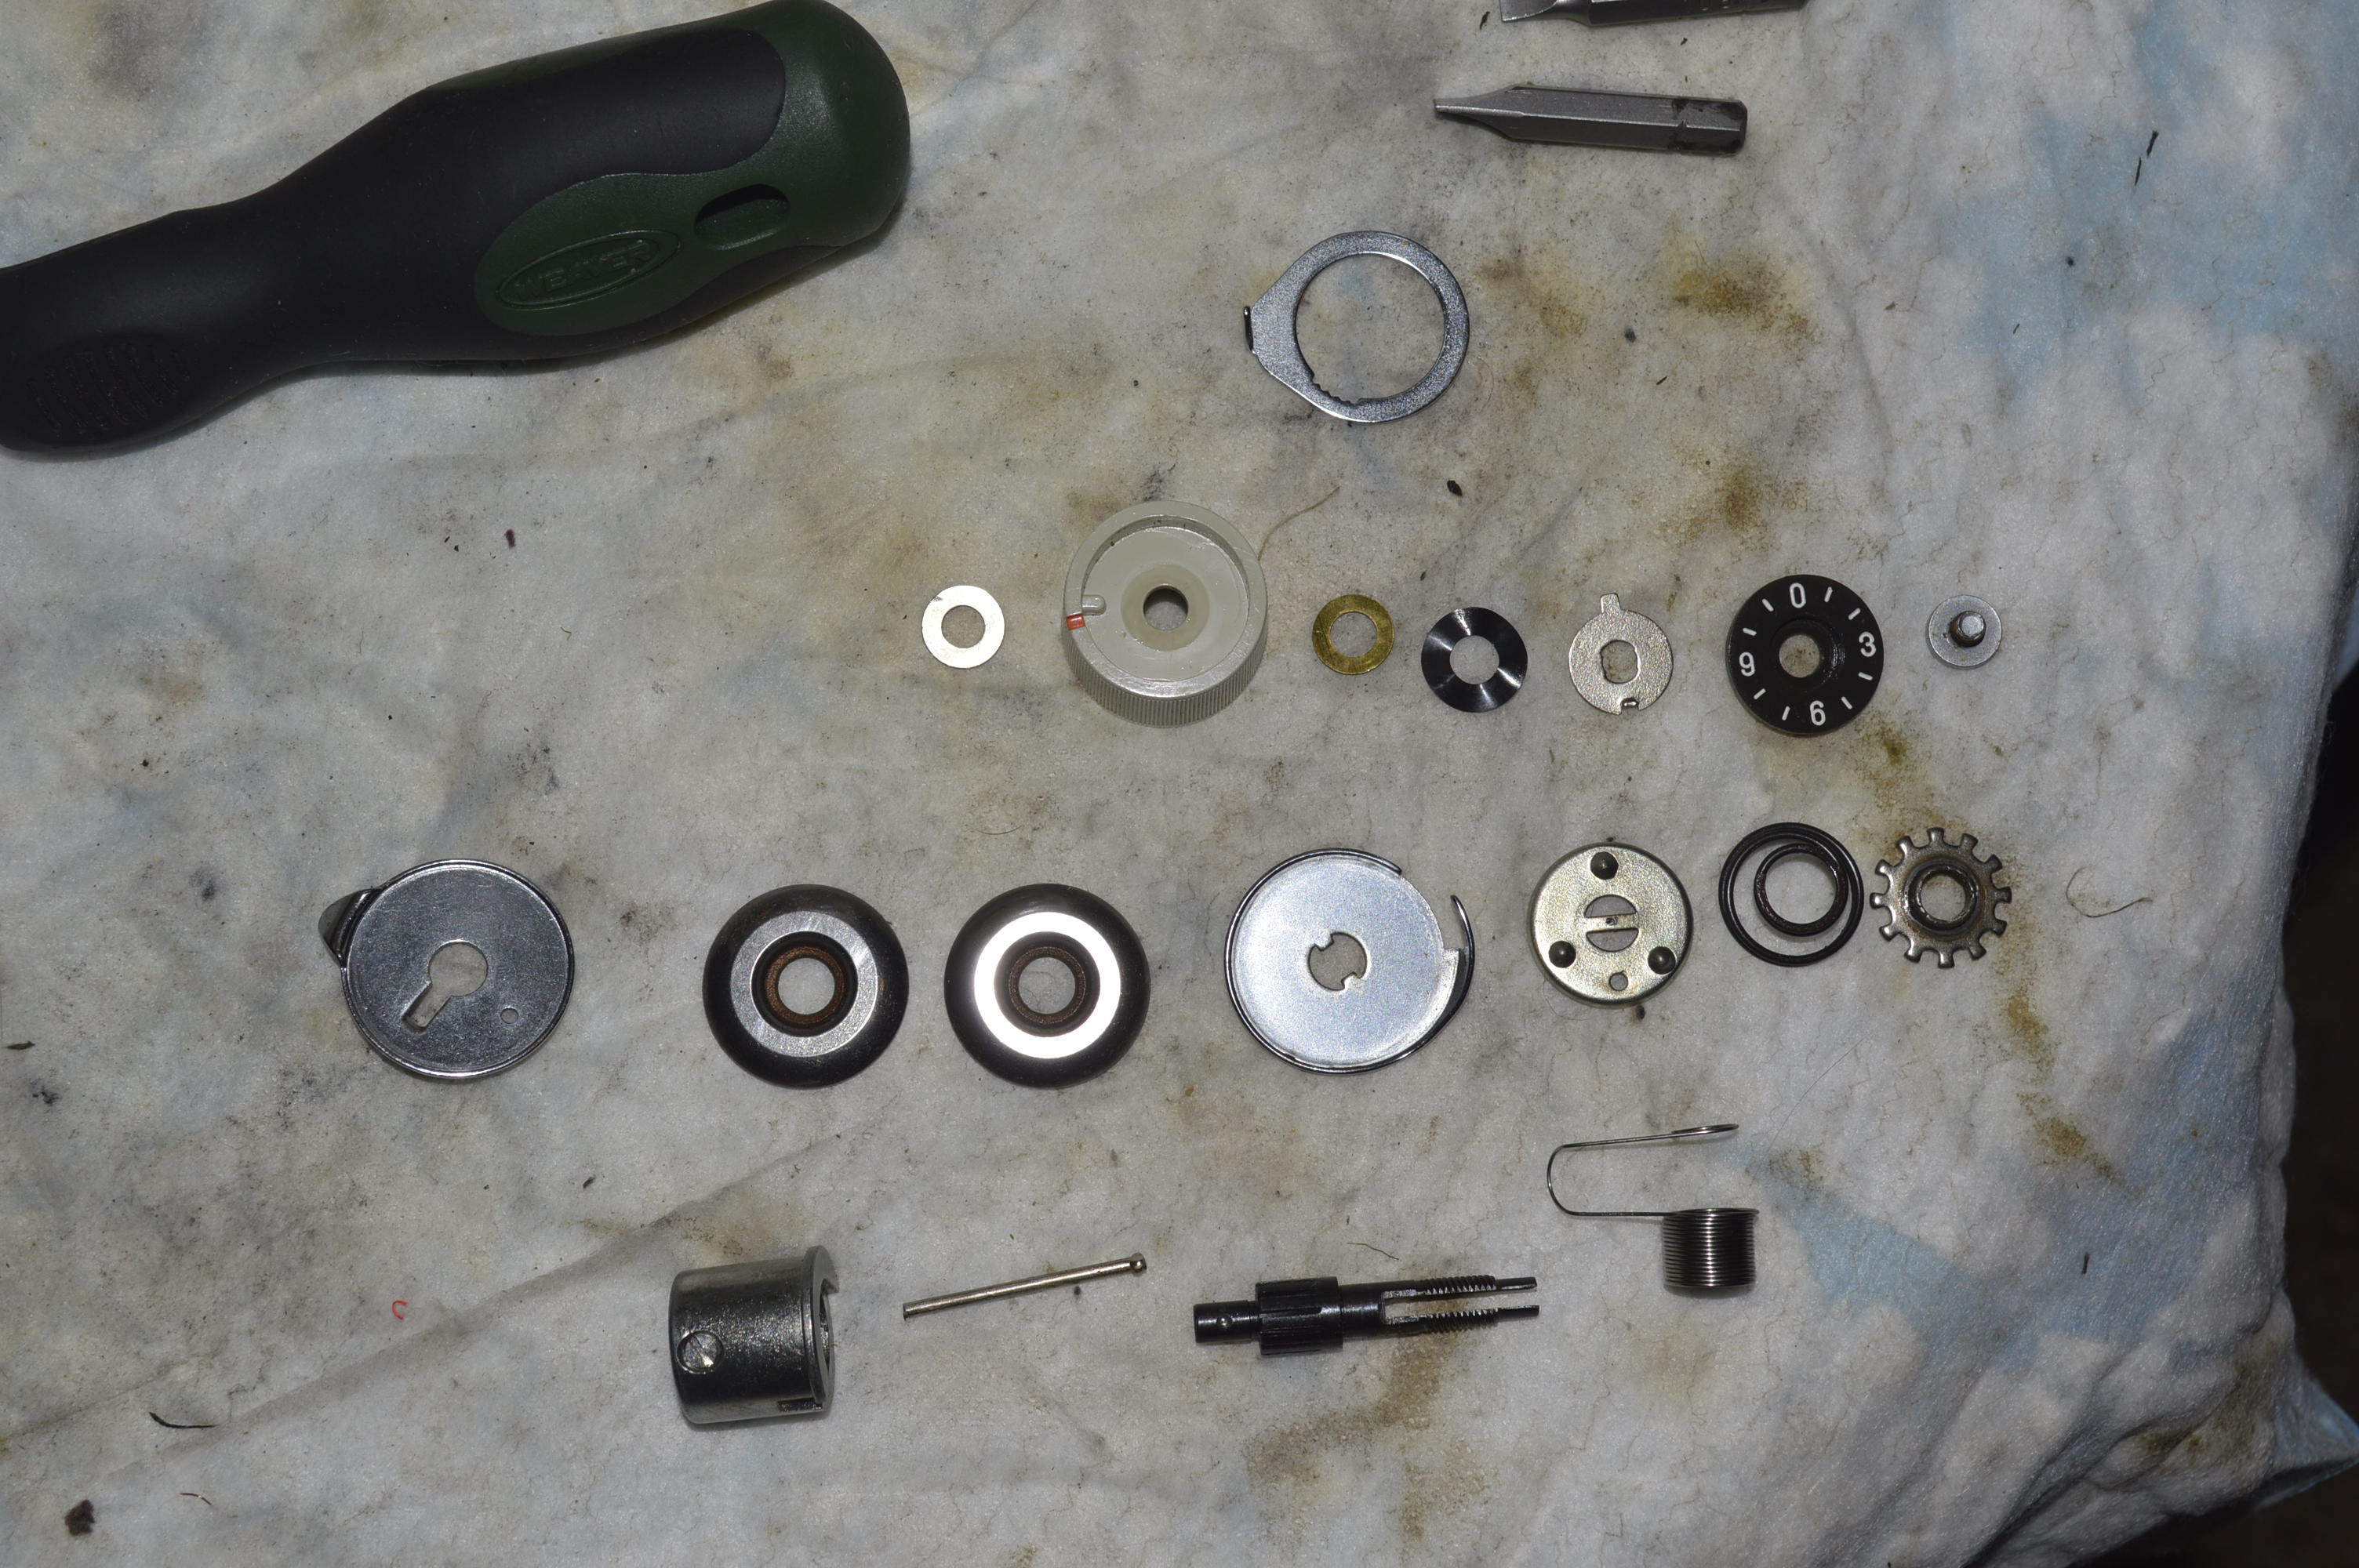
The washer with the tab will only fit two ways on the the post. The hole is not round, it is more of an oblong with straight sides. It can be put on upside down. We will make sure all of the parts orientation is correct in reassembly, so we don’t worry about how parts are installed during disassembly. This is one good example of where reassembly is not necessarily the reverse of disassembly. Remove all of the parts associated with the tension control knob… up to the beehive spring retainer nut. Laid out on the bench, these are the parts you should see. It doesn’t hurt to take a picture for reference at this point.

The next picture shows the part of the mechanism that applies pressure (“tension”) to the thread. Remove the slotted nut that rests against the beehive spring. Note that the crown on the nut faces the machine. Again, this part can be installed backwards incorrectly. Then remove the beehive spring.

The second row of parts shown are the parts that are removed in this order…
- Remove the slotted nut
- Remove the beehive (cone shaped) spring
- Remove the take up spring limit plate (note the 3 dimples)
Everything behind the thread guide plate is captured by the loop end of the tension spring. Great care needs to be taken here, because the spring will need to be stretched over the tension assembly post to remove the remaining parts. It is a spring, and it will stretch, but if you stretch it too far, it will deform… we don’t want that. Refer to the same picture…

- Remove thread guide plate.
- Remove the tension discs buy pulling them up to the end of the post, and sliding them off the edge of the post to stretch the spring as little as possible.
- Remove the tension disc back up plate.
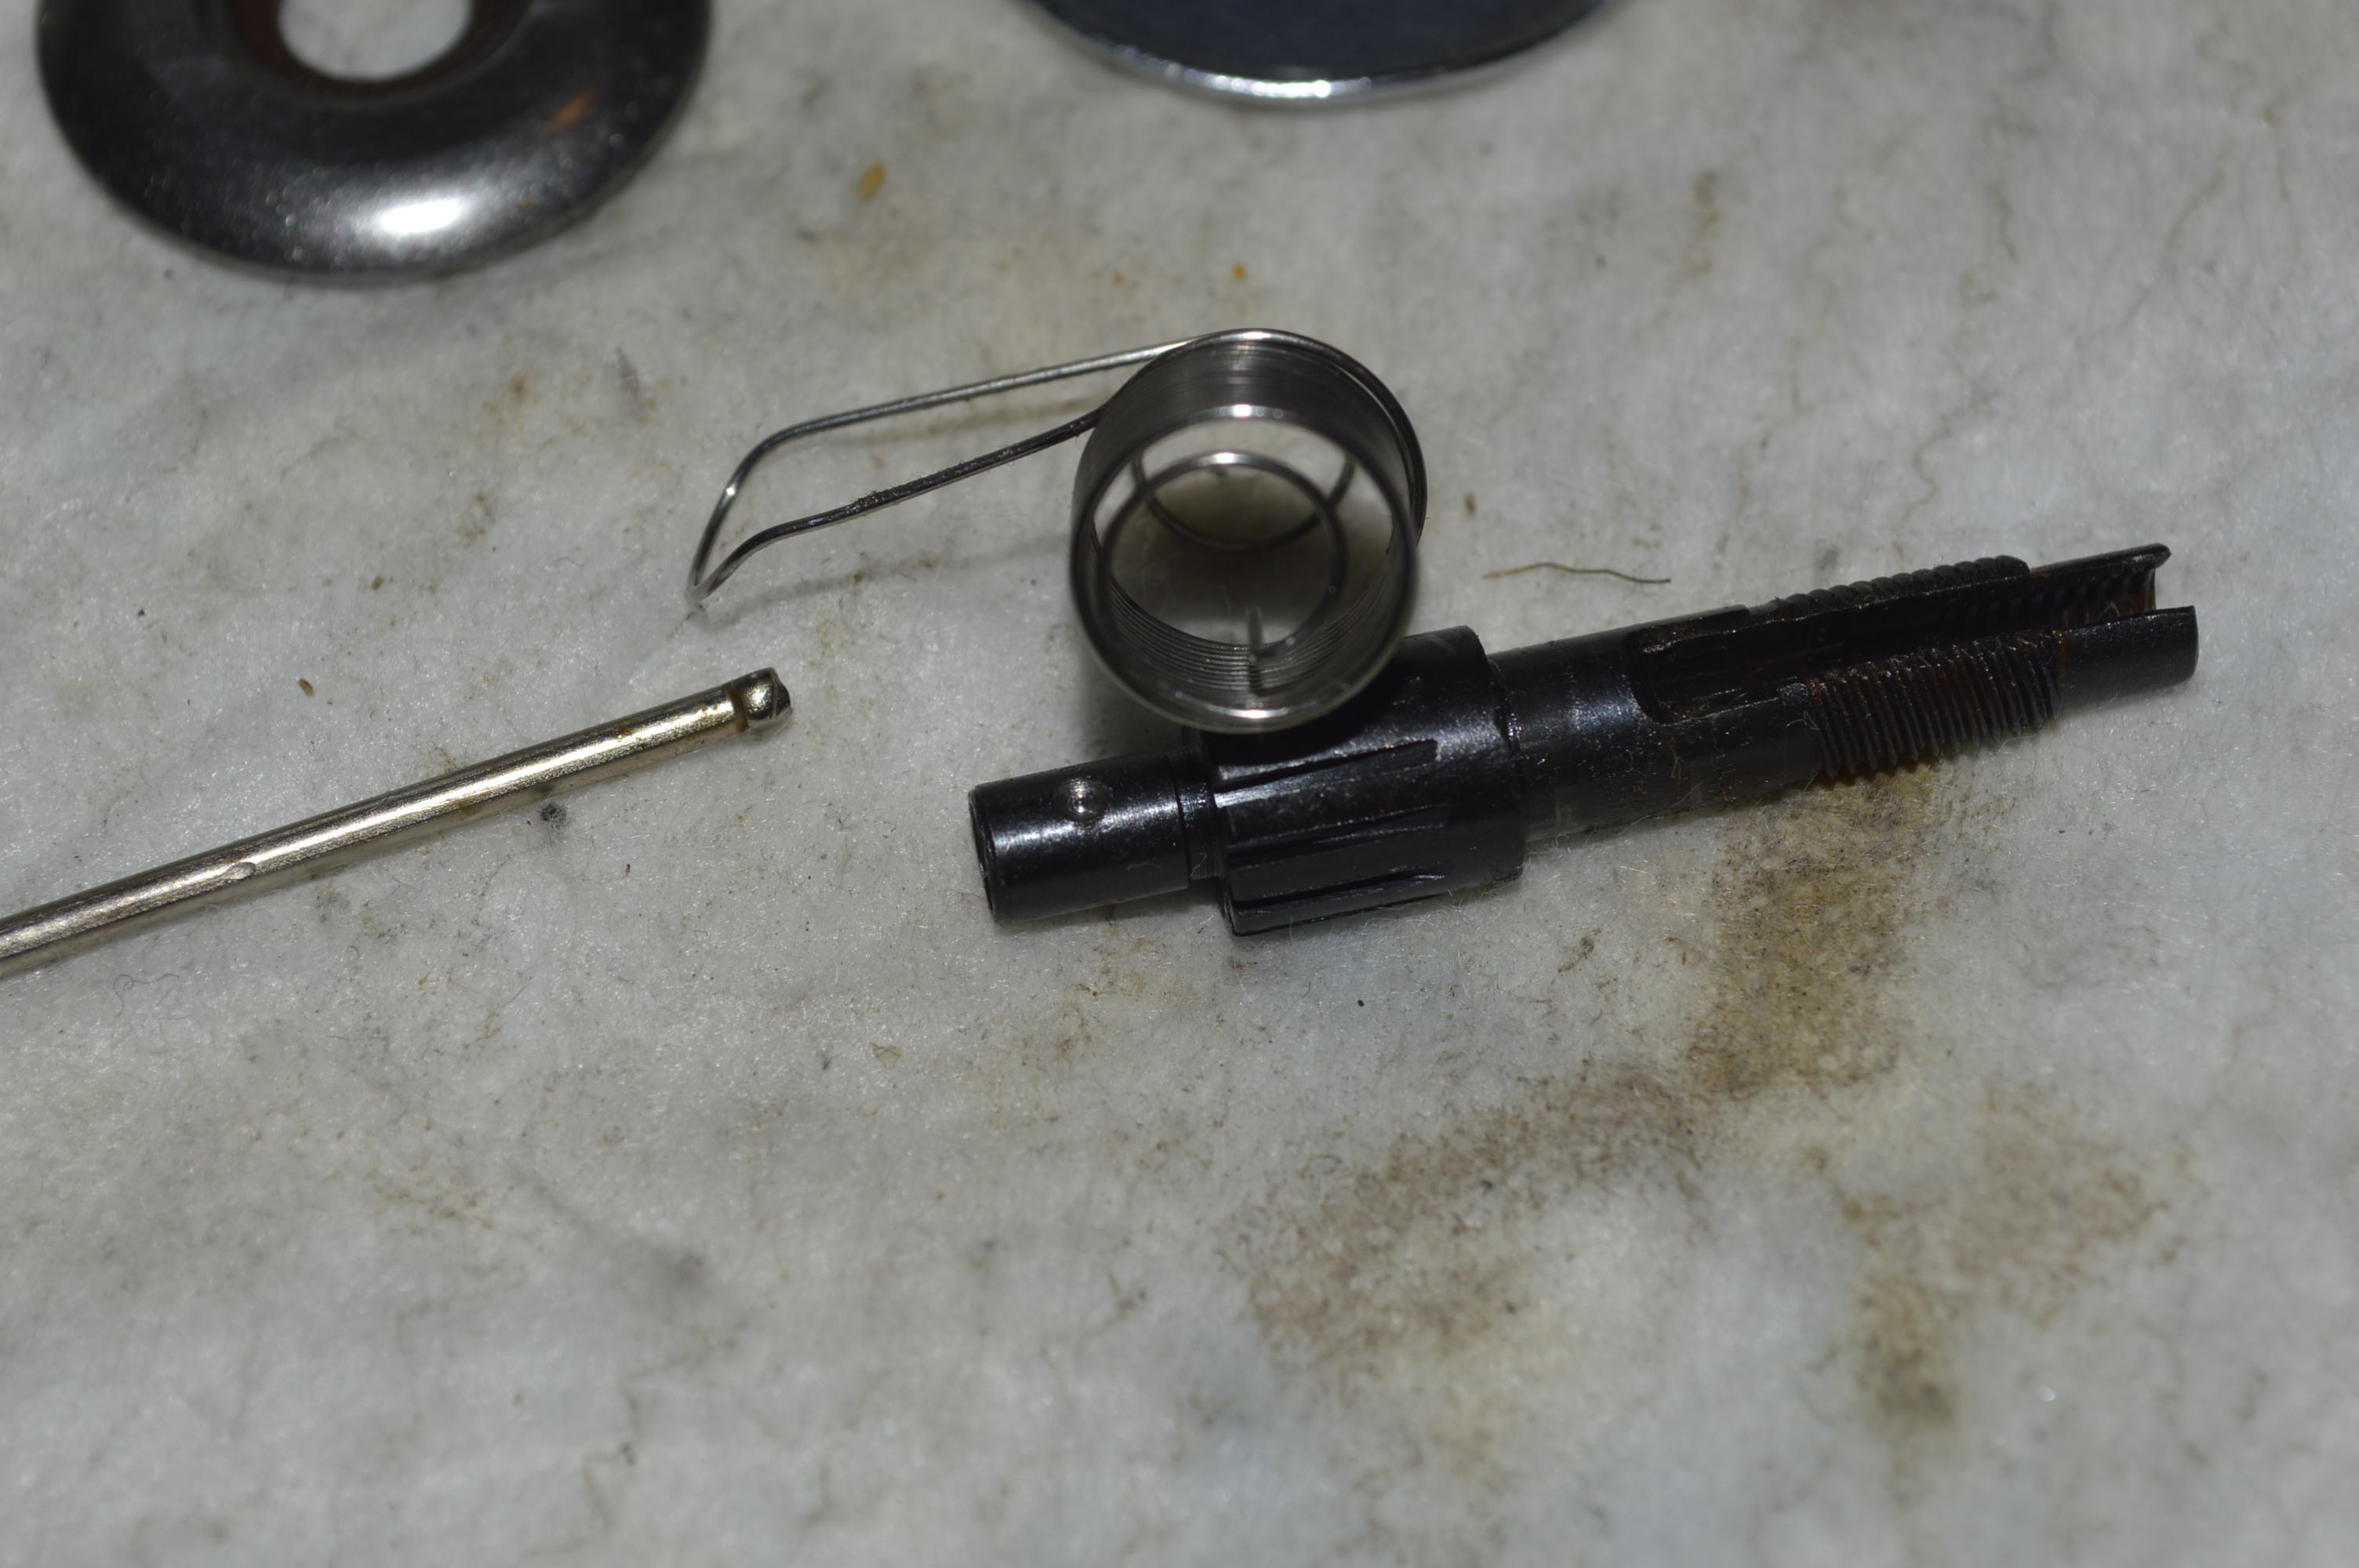
Note that the spring cannot be removed at this point, but the tension release pin (actuated by the presser foot lift lever) can be removed by tipping the tension assembly post upside down, If it does not slide out, tap it into your palm. Note that one end of the pin is deformed with the deformed end facing the end of the post.

The next step requires loosening the small set screw in the tension assembly body cup… but don’t remove it. Then…
- Remove the tension assembly post.
- Remove the spring, pulling it from the smooth end of the post.
All of these parts should be accounted for and can now be cleaned for reassembly.
REASSEMBLY
Reassembly begins with orienting the take up spring on the post, and reinstalling it in the tension assembly body cup. Look at the picture closely, the spring has a hook on the coil end. This hook engages in one of the small slots in the post end. Holding the post with the large slot of the post facing horizontal (not up), slide the spring onto the back end of the post. Let the spring loop hang at the 6 o’clock position, and slide the hook on the coil such that it engages in the slot on the post that allows the spring to hang straight down. Slide the post and the spring in the cup. Looking at the cup, you should see a small mark on the cup left by the set screw that held it in the machine. Make sure the large slot in the post lines up horizontally with this mark. Raise the spring so it rests on the ledge cut into the cup. Tighten the cup set screw.
- Reinstall the tension release pin, deformed end facing out.
- Slide the tension disc backup plate onto the post, stretching the take up spring only enough to clear the plate. Note the tab on the backup plate. It fits into the slot shown on the body.
- Install the first tension disc, bevel edge facing towards the end of the post.
- Install the second tension disc, bevel edge facing toward the cup end.
- Install the thread guide plate. Remember, only stretch the spring enough to slide these parts over the end of the post.
- Stretch the loop end of the spring over the end of the post.
- Install the take up spring limit plate. It will fit on the post two ways. To operate properly, make sure one of the dimples is at the 12 o’clock position with the dimples facing the plate.
It should look like this…

- Reinstall the beehive spring, cone base facing the end of the cup.
- Loosely start the threaded nut with the crown side facing the spring. Turn it only to engage the first thread (just to the point it wont fall off). The remaining reassembly will refer to the following picture.

- Install the small washer on the post
- Place the tension dial on the post. Holding the cup so the slot in the post is horizontal and the spring to the left, Make sure the red mark on the dial is at the 12 o’clock position.
- Install the bronze colored washer on the post.
- place the “rippled” washer on the post.
The next washer has an orientation that must be installed correctly. The tab should face the 12 o’clock position, and the smaller bent tab at the bottom should be facing out. It should look like this.
Position the plastic number dial with the “0” at the red mark, the small bent tab will fit into a small slot on the back of the number dial at the 6 o’clock position. You will know when it engages when the dial face fits flush with the knob. The last step is to install the screw and tighten it securely.
The tension assembly is complete. The assembly should feel somewhat loose at this point because it is at “0” tension. The slotted nut that was installed loosely before will start to clamp the discs pretty fast as the dial is tightened.
- Place the thread take up spring travel adjustment plate over the cup end of the tension assembly and reinstall the assembly into the machine.
- Tighten the set screw that holds the assembly in the machine.
That’s it! If your tension assembly didn’t operate smoothly before, or if it was assembled differently than this, it should work smoothly now. Assuming the bobbin tension is close to being in proper adjustment, I have found that at a tension setting of “4” on the dial gives just about right tension for a balanced stitch.
Well, I hope this post wasn’t to long, or long winded, but as much as I see tension assemblies improperly assembled, and the fact that it is one of the most important adjustments for proper stitch formation, I thought it might help if you are having problems with your tension setting.
As always, our tutorials are provided as a free resource to help you learn and maintain your vintage sewing machine. As our site has grown, so has the cost to keep and maintain it. Despite these costs, I will strive to continue posting tutorials and other relevant content for the benefit of the sewing community. If you found the content of this tutorial useful, please consider making a small donation to help me grow the site and help defray my costs… every little bit helps.
Help Support our Site…
Make a one-time donation
Make a monthly donation
Make a yearly donation
Choose an amount
Or enter a custom amount
Your contribution is appreciated.
Your contribution is appreciated.
Your contribution is appreciated.
Please let me know if I can answer any questions or if I can be of any assistance by emailing me at pungoliving@gmail.com.
Thanks for reading!
Lee

This post was a lifesaver! Thank you!
LikeLike
You’ve saved me twice now! Once on my 1755 and now on my ultra stitch 12! You are always such a help and wonderful photos!
LikeLike
Thanks Donna,
Let me know if I can be of any more help!
Lee
LikeLike
Will this work for tension on a white 166? Your step by step with all parts is what I need before starting on mine.
LikeLike
Hello Diane,
If you send me a picture of your machine to pungoliving@gmail.com and I may be able to better answer your question.
Thanks!
Lee
LikeLike
Exactly what I needed to verify that I did reassemble and adjust my tensioner correctly and that that does not seem to be my whole problem. My takeup spring does not relax when the tensioner opens. When I cut the thread from a stitch the spring pops and pulls the thread out of the needle. (D’Oh!) The thread is dragging somewhere between the takeup spring and the spool pin. I’ve cleaned and inspected the path and polished burrs and sharp edges but the only thing I’ve found is the force required to pull thread from the spool keeps it just tight enough to bind at one of the contact points… My wife’s Singer does not do this, but it has a horizontal spool and pulls from the end, whereas Kenny’s is vertical and pulls from the side. Maybe I’ll just build a ball bearing spool pin! Otherwise, it runs smooth and quiet and makes a nice stitch. Any ideas?
LikeLike
Hello Dave,
What stands out in your question is that the take up spring does not relax when the the tensioner opens… the take up spring should not be affected with it open or closed. The tension created at the spool pin should be negligible compared to the tension created between the tension discs. I don’t think the problem is in the thread path. Also, the tension spring is on the “tensioned” side of the thread. The take up spring pulls from the needle… not from the spool. If the problem is caused by something dragging somewhere in the thread path, it is between the spring and the needle. Still, I don’t think is a problem with the thread path.
With the machine unthreaded, the take up spring should spring back smoothly and not bind before resting on the take up spring stop. If not, I suspect the the spring is bent. When assembling the tensioner, I normally set the spring at the 6 o’clock position on the tensioner shaft. By the time the tensioner is reassembled and the spring positioned against the spring stop, there is enough tension in the spring to operate smoothly. The spring rests between 2 of 3 dimples on the tension disc backing plate. Check to see that the spring has enough travel between these dimples for full travel from rest to it’s highest point.
Please confirm that the spring is operating smoothly with the tensioner open and closed. If not, the problem suspect is the spring.
Let me know what you find.
Thanks and I hope this helps.
Lee
LikeLike
Thanks for the reply.
The spring moves freely and does not touch anything but the stop, and the tension discs are free/loose when the presser is lifted. At this point there should be, essentially, no friction/tension on the thread. But when I pull on the thread at the needle the spring is lifted off the stop all the way up to the hook on the tensioner before the thread is pulled from the spool. If I move the spool by hand the tension there is relieved and everyone is happy.
I agree the spool tension should be negligible, but that’s what I saw. Focusing there, I discovered the/a plastic washer under the spool was not hard, slick, low friction nylon but soft, tacky urethane… My issue was greatly improved after removing the washer and setting the spool directly against the top cover. When I rigged a wire to pull the thread from the end of the spool the problem was eliminated. I can pull the thread all the way through and the spring does not move until the tensioner is closed.
Now I just need to go back and readjust my tensions after having everything apart a dozen times. So, that’s one more thing I know how to do, knowledge I cross-apply every day. These machines are a mechanical wonder.
FYI, this is a 1983 Taiwan .1281 Ultrastitch 12, all metal except cam stack. Was stiff when I got it last fall. Cleaned, lubed, adjusted everything, no noise, no binds.
LikeLike
Good morning Dave,
Sounds like you figured it out. I’m glad that it was a simple fix. I use spool pin felts under the thread spool. Even a small piece of fabric would help. No doubt you have a better appreciation of these vintage machines after you spend the time to take them apart and figure out nuisances like this. Good luck with your Kenmore and let me know if I can be of any assistance!
Lee
LikeLike
Thank you so much for the pictured layout sequence. Now I know my tension assembly is missing the wavy washer. Some former owner may have lost it because it’s been apart a few times. No wonder the assembly was so sloppy. Time to go internet shopping for a replacement.
LikeLike
The tension assembly has a lot of pieces and it is not unusual to get them mixed up… that’s why I use pictures to show the layout! I’m glad it helped!
LikeLike
You saved this machine. I bought it for a friend and the tension dial was messed up. I took it apart, but it was all out of sorts. With your post, I was able to reassemble and make it work. I was able to gift to her for her work. Thank you so much for taking the time and photos. I am very grateful.
LikeLike
Thank you! I am glad that the tutorial helped you sort out the problem. It is gratifying to hear that you were successful and I appreciate you letting me know.
Lee
LikeLike
Wow! I love old Kennies and have five of them as well as two vintage White machines, an old Euro Pro serger, a 1980’s BabyLock and two very modern computerized Brother machines. Like you, we’re retired and like your wife, I adore sewing! I’ve made all kinds of things from decor pillows to underwear, wallets, handbags, dresses, shirts, vests, bathing suits and wedding gowns. Remember “Leisure” suits? I even made my dad one of those many years ago. I made my daughter’s wedding gown on a 1969 158-14001 and it came out beautifully. No more gowns though, too much work! Unfortunately, my darling husband is not the least bit mechanically inclined but I enjoy tinkering as well as sewing so I have learned how to maintain my machines. I’m becoming pretty good at taking “new” acquisitions partially apart for a good cleaning, oiling, adding grease (only on the appropriate gears) and “tuning up” motors. It’s rewarding and fun. The one thing I haven’t done, and luckily I haven’t needed to do, is fixing tension assemblies. I’ve been too wary to try. Your beautifully photographed, step-by-step tutorial is PURE GOLD! Thank you so much. Now I can’t wait to go back and view your other blog posts!
LikeLike
Hello Suzanne.
Thank you for encouraging me! I’m glad you found my blog useful, and I have found much enjoyment in writing and helping others. I am always looking for new blog topics and please let me know if you can offer a topic that would benefit you and others.
It has been some time since I have posted a blog, but I am again finding the time and ability to take on some new projects! I hope 2021 will get me back to writing my tutorials and finish some restorations that have been waiting for months.
Thank you and have a blessed night!
Lee
LikeLike
This was remarkably helpful, but you might want to add one piece of advice at the very beginning: make sure that the presser foot is down so that you don’t think something has gone wrong with the tension assembly because it’s suddenly all loose like you’ve never noticed before. I got it apart and back together with no trouble, but when I stuck it back in the machine, it was loose again. Then I remembered you mentioned something about the presser foot half way through, and I lowered it and it was tight again.
Thanks for the detailed how-to.
LikeLike
Thank you!
LikeLike