
If you have a vintage Kenmore 158.somthing sewing machine, this tutorial applies to your machine.
There is lots of information about maintenance oiling and cleaning your machine. This regular maintenance should not be ignored, and if done regularly will extend the lifespan of your Kenmore to near infinity… well, a long time. But what about un-scheduled maintenance?
One part in the machine that does not get any attention, and is not included in the machine maintenance section in the user’s manual, is the gear case. The gear case is the part of your sewing machine that houses the oscillating gears that drive the oscillating bobbin. It is greased at the factory, and I guess the manufacturer didn’t think the grease would ever need changing. Then again, they probably didn’t foresee these machines sewing great 45 or more years after they were manufactured.
The fact is, the grease in your vintage Kenmore HAS broken down and is no longer lubricating the gears. I am 100% certain of it. After many Kenmore restorations, I have never seen one that didn’t need new grease and it is a regular step in a restoration.
Now, it is not likely that this failure of the grease will stop your Kenmore from sewing. Despite the work they do in the machine, compared to the durability of the steel gears it is not likely to cause failure… however, it will result in more noise and adversely affect the smoothness your Kenmore is capable of.
Re-lubricating the gears is simple to do, and this tutorial will show you how to replace the gear grease in your Kenmore.
All you need is a screwdriver, maybe some cotton swabs or a small brush, and some paper towels. Any automotive bearing grease will work and is available at a reasonable price. Get the smallest quantity you can find.
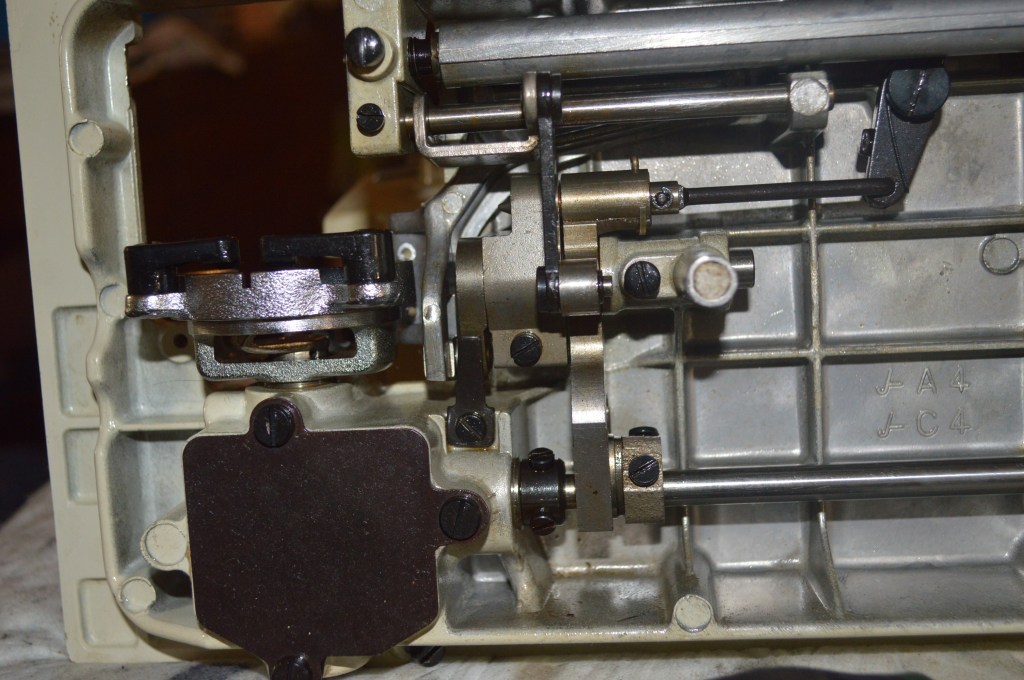
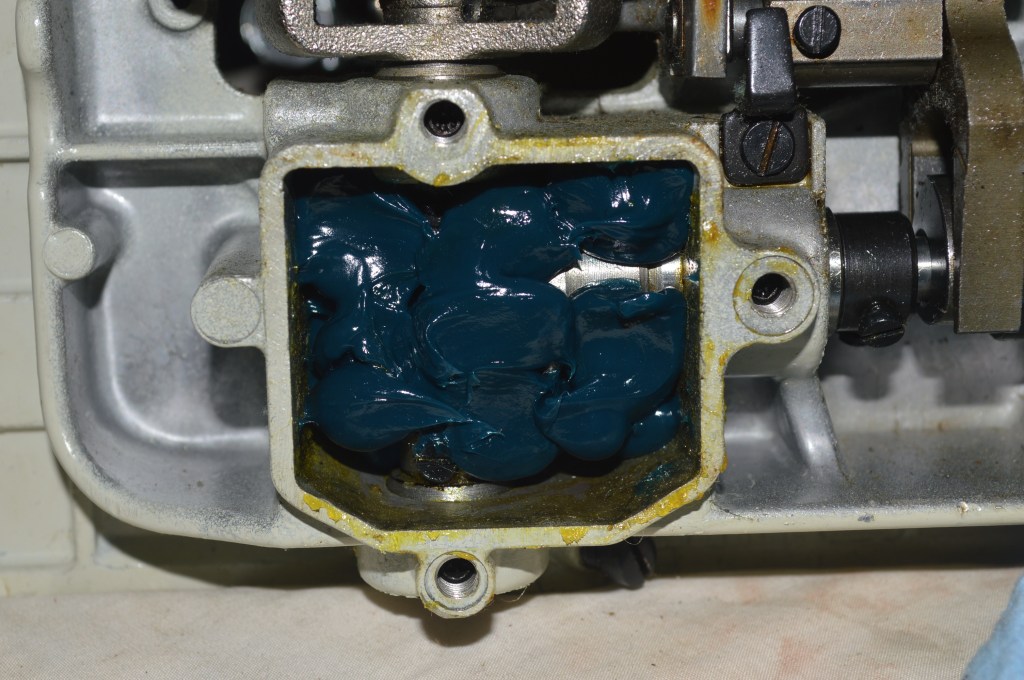
The gearcase is under the bed and is easy to identify by the three screws and cover plate shown in the picture.
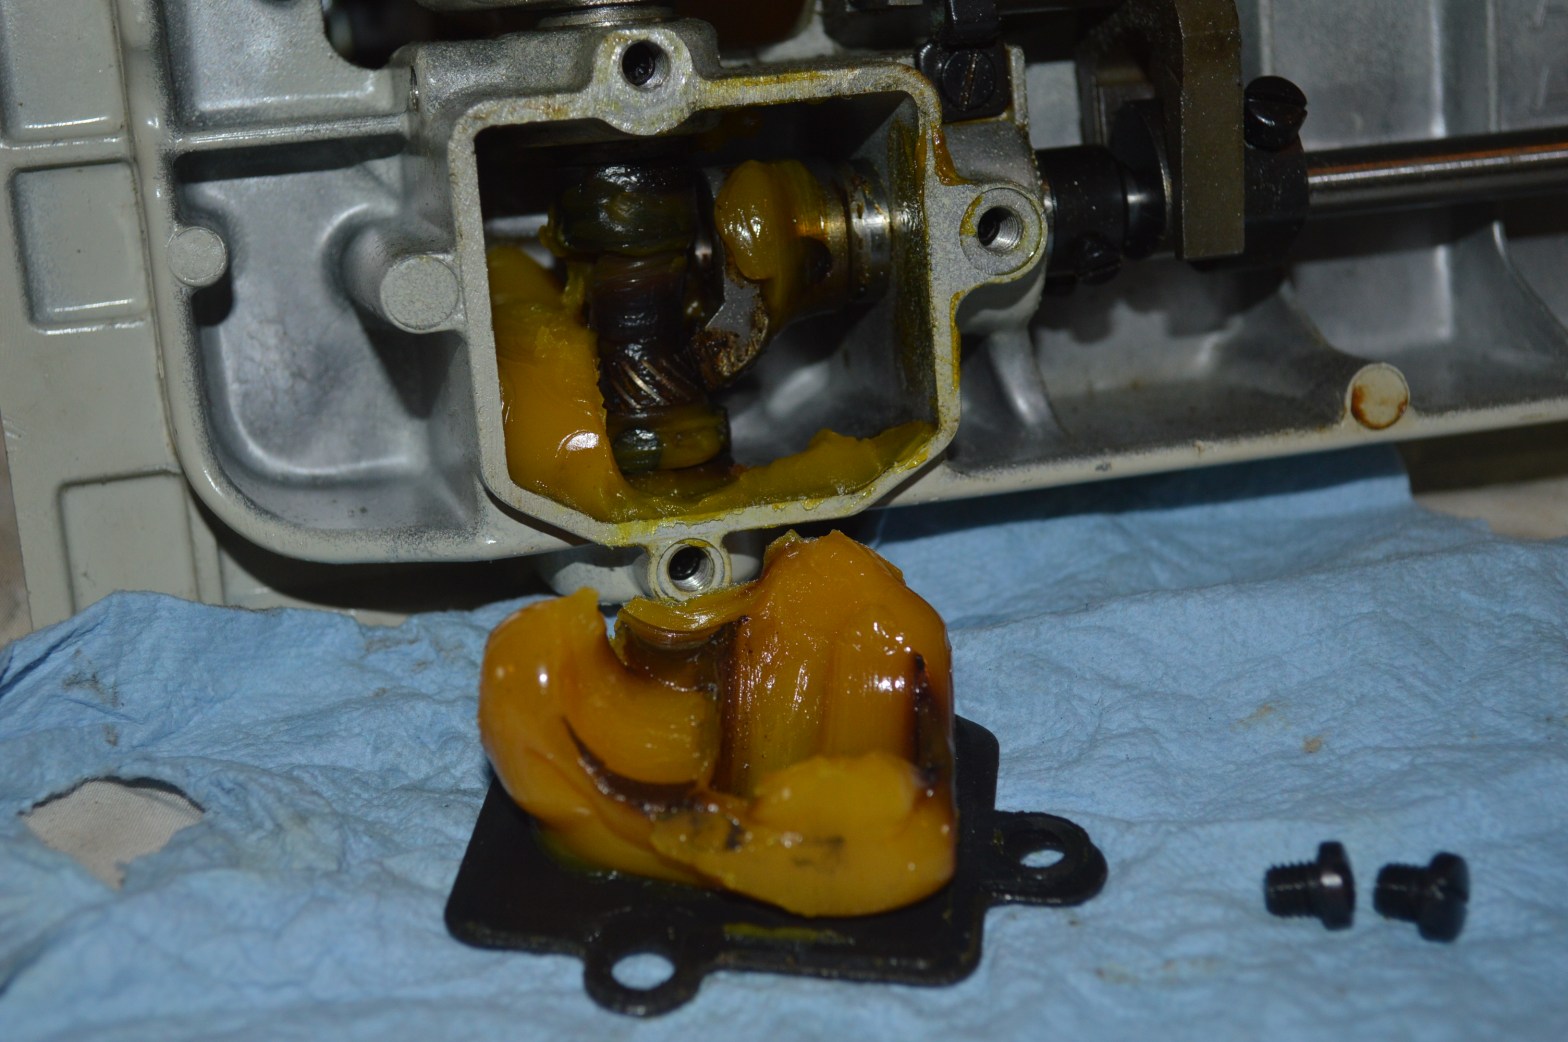
Place some paper towels under the gear case and remove the three screws and the cover plate make sure the thin cover gasket is not damaged .

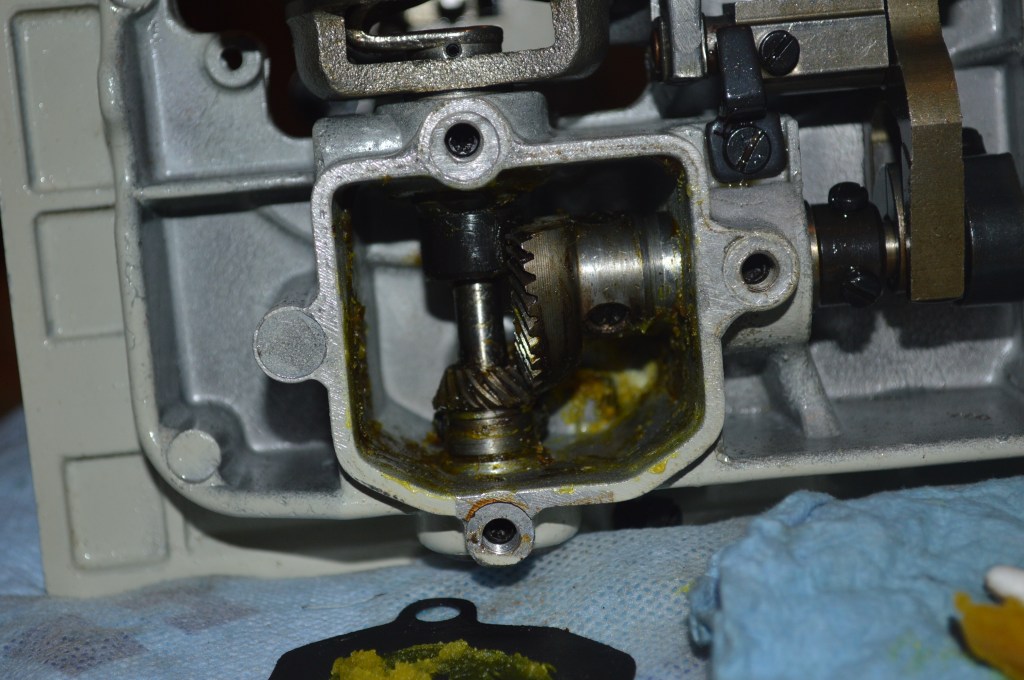
The old grease has turned to the consistency of bees wax. You can even see the outline of the gear teeth in the grease, but no grease on the gears.
Using a small screwdriver, tooth picks, cotton swabs, or any small tool that you have, remove the old grease from the gears and gearcase. It is stiff and will come out easily… it will also stick to anything it touches, so use the paper towel to wipe the grease from the implement you are using. Rotate the balance wheel to turn the gears and give better access to remove as much of the old grease as possible.
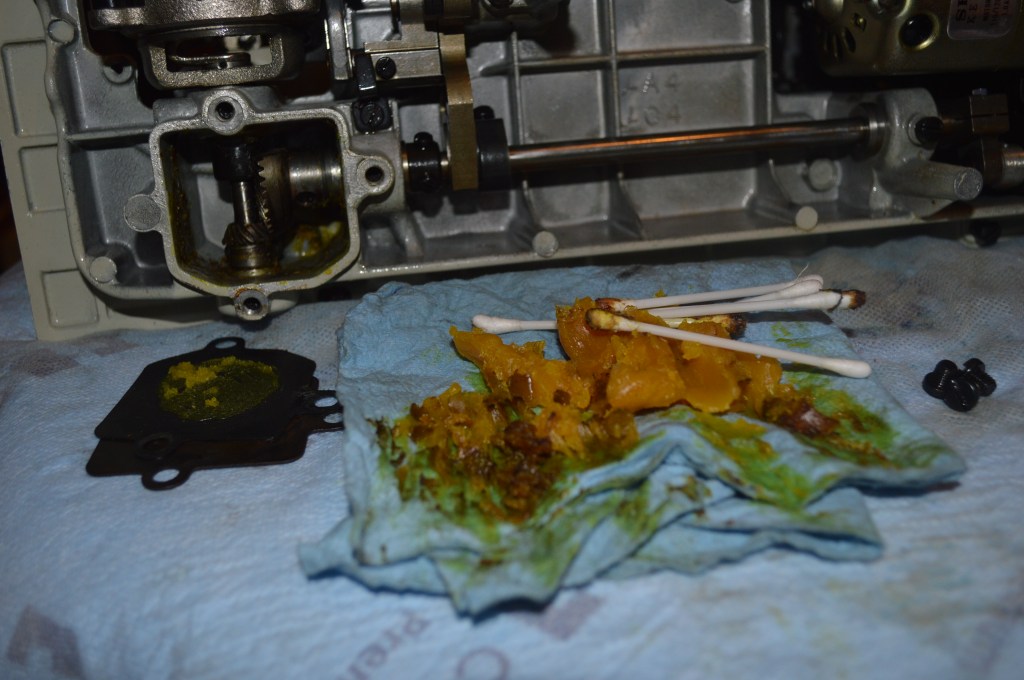
You do not need to worry about leaving a little old grease behind, but I follow up with a small chip brush to remove as much as I can get. Next, the new grease is packed into the case.
Do not completely fill the case with grease. it needs room to move with the gears. Do make sure you get grease behind the gears so the gears are in full contact with the grease.
Replace the plate and gasket with the 3 screws and tighten snugly… don’t overtighten.
That’s it! Your Kenmore will be quieter and run smoother, and you will probably never need to worry about re-lubricating gears for another 45 or 50 years!
I hope you found this information useful!
Please feel free to visit our Etsy store “Pungoliving” to see our fine quality restored vintage sewing machines and the work we do to restore them. They all have links to their respective restoration blog, or follow the link below:
https://www.etsy.com/shop/pungoliving
As always, our tutorials are provided as a free resource to help you learn and maintain your vintage sewing machine. As our site has grown, so has the cost to keep and maintain it. Despite these cost, I will strive to continue posting tutorials and other relevant content for the benefit of the sewing community. If you found the content of this tutorial useful, please consider making a small donation to help me grow the site and help defray my costs… every little bit helps.
Help Support our Site…
Make a one-time donation
Make a monthly donation
Make a yearly donation
Choose an amount
Or enter a custom amount
Your contribution is appreciated.
Your contribution is appreciated.
Your contribution is appreciated.
If you have any questions or if I can be of any assistance, please email me at pungolivimg@gmail.com.
Thanks for reading!
Lee

Thank you for the tutorial. I recently pulled out my trusty 1973 Kenmore 158.1703 to sew masks and was struck by what a reliable workhorse it is. I plan to re-lubricate the gear case after I finish my mask project and this tutorial is very helpful.
Do you know where these 1970s Kenmores were made? I have read some information somewhere that they were made in Japan or in Taiwan. Elsewhere I have read that they are re-branded US-made Singers.
Once again, thank you for the blog. It’s full of good photos and excellent documentation.
LikeLike
Hello! I’m glad you found my blog useful. Your 1703 is a keeper. All of the 158 series Kenmore’s were made in Japan by the Maruzen Company (renamed to Jaguar in 1978). Later 158 series Kenmore’s were made in Taiwan, but I do not think these machines have the same build quality as those made in Japan… some may disagree. Your 1730 is all metal. This means that you can rely on it to sew for many more years. The key to these machines is keeping them oiled with sewing machine oil, and cleaning lint from the bobbin and feed dog areas.
None are rebranded Singer’s and none are made in the USA. The US Government provided Japan with the Singer blueprints for the Model 15 following WW2 and they were then “cloned” by various Japanese companies… they are still made today in places like India, Turkey, and Mexico. The Japanese made Model 15 clones are very high quality machines. Singer did buy a stake in the Japanese Pine Sewing Machine factory and produced badged Singers, most notably the Singer Merritt machines. The Pine Sewing Machine Company later became the Janome Sewing Machine Company.
One thing is for certain, nobody makes a sewing machine today like they made your 1730. Like I said, it’s a keeper.
Good luck and let me know if you have any questions about your machine.
Have a great weekend,
Lee
LikeLike
Wow – thank you so much for the detailed information. You are a fount of knowledge. The 158 feels and behaves so similar to the Singer 301a I grew up with, I wondered if there was a Singer connection.
This is my second Kenmore 158. I liked my first one so much, I bought a second when I moved cross-country. I waited and watched until one popped up on Craigslist and then I pounced quickly on it. My original 158 is in my son’s safekeeping back in California for his use.
LikeLike
Lee, thank you for this detailed tutorial. I have 4 of the Maruzen Kenmores and I love them all. The oldest is an Iris 158.481 from 63-64. My everyday workhorse I learned to sew on as a kid, is a lemon smoke 158.13160 from 71-72. I also have a portable 158.17570 from 72. The one giving me some difficulty is a 158.18033 from 73-74. I have cleaned and serviced everything on the machine except the gear case. It runs, but it’s noisy and hesitates on starting. I bet this is the issue and I’m going to take care of it this week. Thank you so much!
LikeLike
Great! Please let me know if it quiets your 1803 down!
LikeLike
Hi I have recently begun restoring an seized up Model # 148.19370 I have almost everything functioning now but one problem. When I put the bobbin hook part back in and run the machine it causes a clunking sound and causes the gears to jump and get the bobbin out of time with the needle. If I run the machine without the hook part of the bobbin in place everything runs smooth with no issues. Can you provide insight on what might cause this?
LikeLike
Hello Patrick,
I would like to help and it would be very useful to get a bit more information before I can narrow down your problem. You mentioned the machine was seized up.
It would be very unusual for a Kenmore to loose needle timing. The only way I can imagine this happening is if the timing of the gears has been tampered with. Other issues with time can be associated with needle bar adjustment, but then again, it is unusual for a Kenmore to loose adjustment here. There are a few things I would like to know and I think we may be able to diagnose the problem.
1. Do you know if the machine was running properly before it seized up? I ask this because it will rule out the possibility that a part was replaced that is not correct for your machine.
2. Can you describe what you did in the restoration as far as parts removal and replacement?
3. When the bobbin hook was put back in, does it run properly without a bobbin case inserted, or does it clunk without the bobbin case inserted.
4. Can you send me a few pictures of your machine (front and top) as well as a picture of the bobbin hook race part, the hook race case (without the hook race inserted), a picture of the hook race inserted in the machine, and a picture of the hook race cover?
Pictures can tell the whole story, and knowing something about the history of the restoration is very useful in figuring out what is going on.
Thanks and have a blessed day!
Lee
LikeLike
Hi Lee. Thank you for the excellent tutorial. I rearranged my sewing room about a year ago, and put my old Kenmore 158.1430 in another room, waiting to haul it off to Goodwill. Boy, am I glad I was lazy and never took it there! I am in the process of restoring it, and this was very helpful. After a good cleaning and oiling, plus the gear case grease replacement, it now purrs like a kitten on the needle end of the machine. The end with the clutch and hand wheel is still a bit noisy, so that may be what I tackle next. That brings me to my question, could it be the belt, and if so, do you have a tutorial on how to replace that (assuming I can find the part)?
LikeLike
Hello Mary,
The 1430 is a very good machine and you will be glad you kept it!
It’s hard to say where noise comes from in the sewing arm section of a Kenmore. The linkages to the cam mechanism are made of metal and are not a tight fit. This leads to places that can cause noise but not affect the operation of the machine. To sum up the best maintenance on the assemblies in a Kenmore in three words is oil, oil, and oil. A drop makes a big difference. Even then, it would not hurt to spray a little WD40 on all of the mechanisms in the sewing arm where it can reach places where there may be some old oil buildup you can’t see. Long term storage is a big contributor to this and lack of lubrication in these places can cause a slapping sound… it may or may not make a difference but it won’t hurt the machine (but keep it off the belt)!
The noise can also be caused my the mechanisms under the machine so check for more than just perceptible side to side play in the rocker arms and looseness in the stitch length joint and the connecting rod joint under the machine. The good news is that even if they are a little loose, the machine will sew just fine.
After the machine is cleaned and oiled, don’t be surprised if it gets quieter the more you use it. Keep in mind that the machine is going to be a bit “clicky” in operation regardless and that’s just it’s nature.
You bring up a good topic for a tutorial on how to change the belt! I would be happy to write one in the next few days and let you know when it posts! I think it would be a benefit to many folks that have the same question.
Thanks for reading and please let me know if I can be of any further assistance!
Have a great afternoon,
Lee
LikeLike
Hello Mary,
I found some spare time today and I wrote a short tutorial for you on how to replace the motor belts on your machine. You can read it at https://pungoliving.home.blog/2021/08/16/a-tutorial-replacing-the-motor-belt-on-a-kenmore-model-158-xxxx-sewing-machine/.
I hope this helps you as well as others!
have a great evening,
Lee
LikeLike
Your are the best! Thank you Lee.
LikeLike
Hello Mary,
Let me know if you have any problems changing your belt!
LikeLike
Lee,
I just wanted you to know that I’m learning a ton from your blog. I appreciate your knowledge so much.
I just found a Kenmore 158-510–a model 51–at a thrift store. It’s that smoky lavender color and it was so gorgeous despite sitting in a cardboard box and filthy. I couldn’t leave her there!
I haven’t turned her on yet because I want to thoroughly clean and oil her first–and inspect the electrical. But NOW I know that I also need to replace the grease in the gear box–something I’ve not seen anywhere else. This machine is going to be amazing when I’m done and she is going to be the centerpiece of my sewing room.
I also enjoyed reading the story of your life and about your significant other–that kind of love and admiration for so many years is so rare (I only ever saw it in one set of grandparents) and it just warmed my heart to read your generous words about your wife. She’s a lucky gal.
Thank you so much for sharing what you know.
LikeLike
Hello Jennifer,
Thank you for your kind words! I enjoy writing tutorials and hope that they help folks keep their machines running like they expect. I just feel blessed that I have found something I can do that is also shared with my wife.
Please let me know if I can be of any assistance if you need it for your machine. It is certainly worth cleaning and cleaning to keep it sewing like it should.
Have a wonderful evening!
Lee
LikeLike
Can you tell me what kind of grease you put in there? My sewing machine after showing three sleeping bags seem to seize up. Wouldn’t rotate at all made myself a video but I can’t post that here. I took apart the gearbox and it looked like yours. I have sprayed it down with WD-40 but I would like to put the grease back in. What kind of grease though?
LikeLike
Hello Jeannie,
The gears can be lubricated with any quality bearing or gear grease. Brand and formulation really doesn’t matter because the gears are not subjected to heavy loads (like in a motor vehicle). You can purchase it at any automotive or big box retail store. Purchase the smallest quantity you can, because it does not take much.
The machine will run smoother and quieter when the gearcase is cleaned and the gears greased.
Let me know if you have any other problems!
Lee
LikeLike
Thank you for this tutorial! I would have never known that I needed to change the grease or how to do it without your help. I acquired a Kenmore 158.1730 last year, and like you said, the grease had to be replaced, although it was in excellent condition and ran quite well before I changed it. Actually, I changed the grease a little after I got it thanks to this tutorial. It was a snap to change the grease, and now I won’t have to think about it for a long while.
LikeLike